Category Archives: Eat/Cook/Learn

#3a9151

I just want to share these pictures of pie

wholeapplepie-2 wholeapplepie-5

I baked this pie over the weekend because…pie.  There’s no other reason that matters, really.

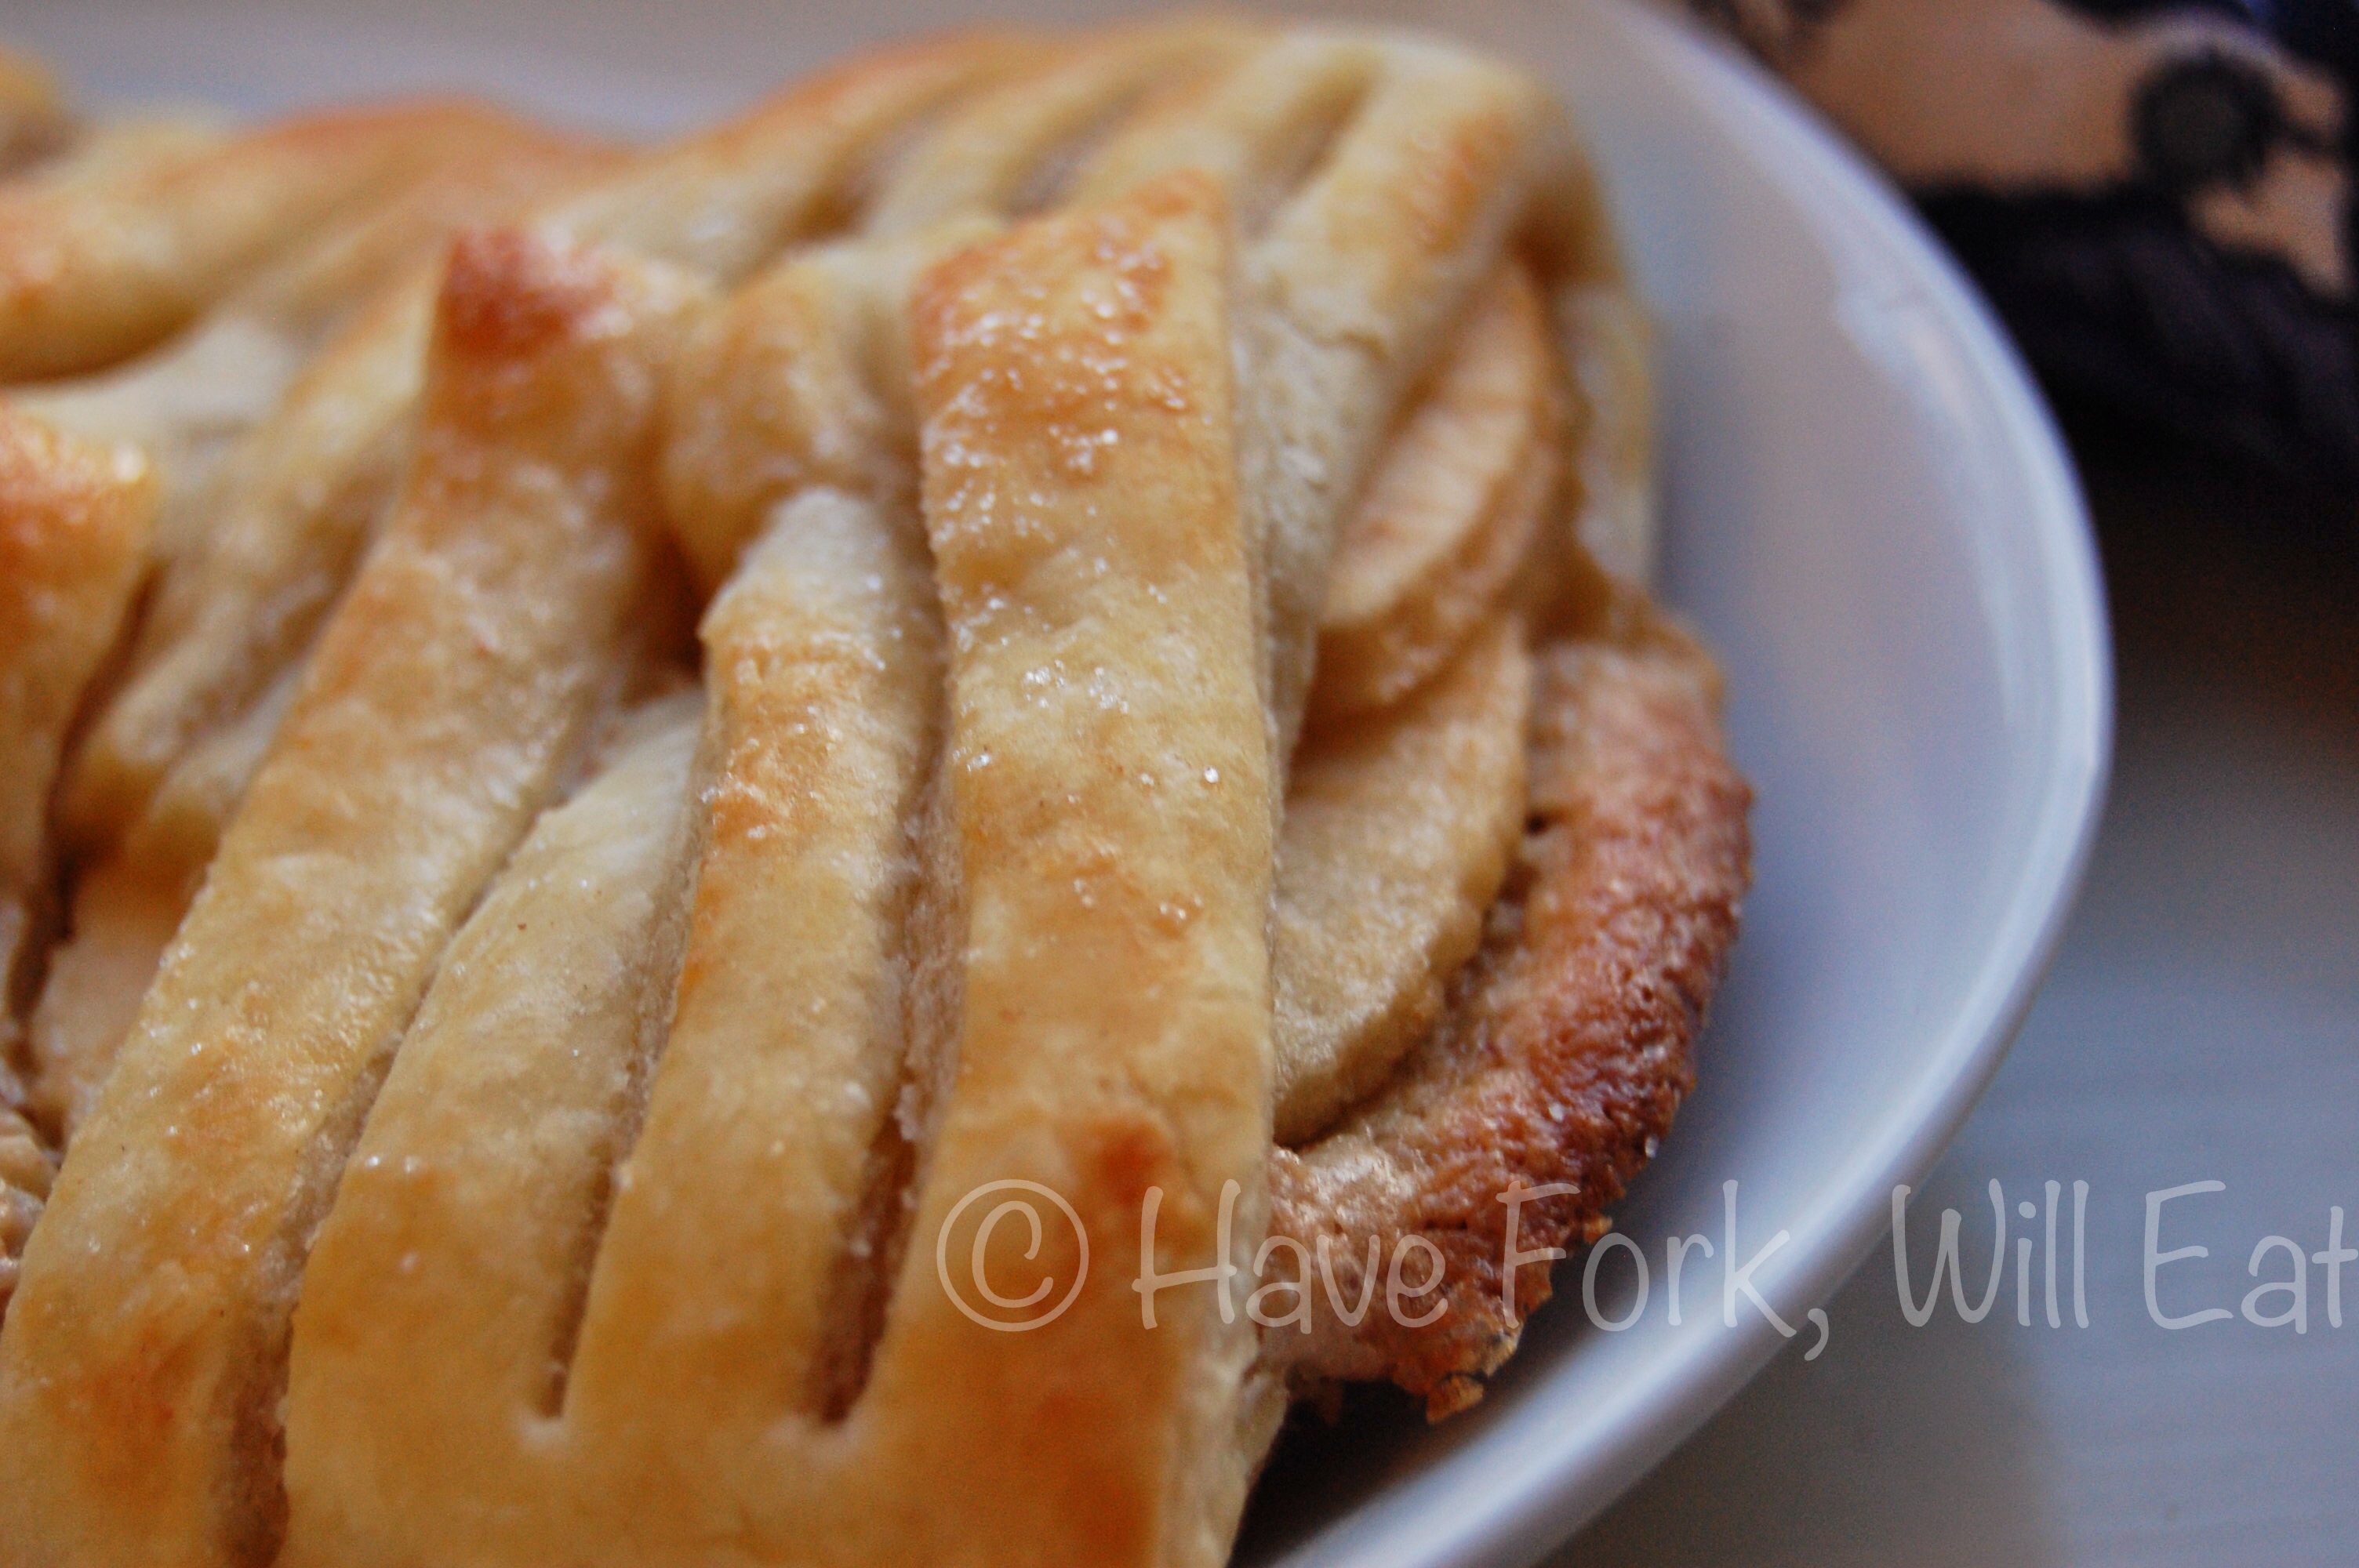
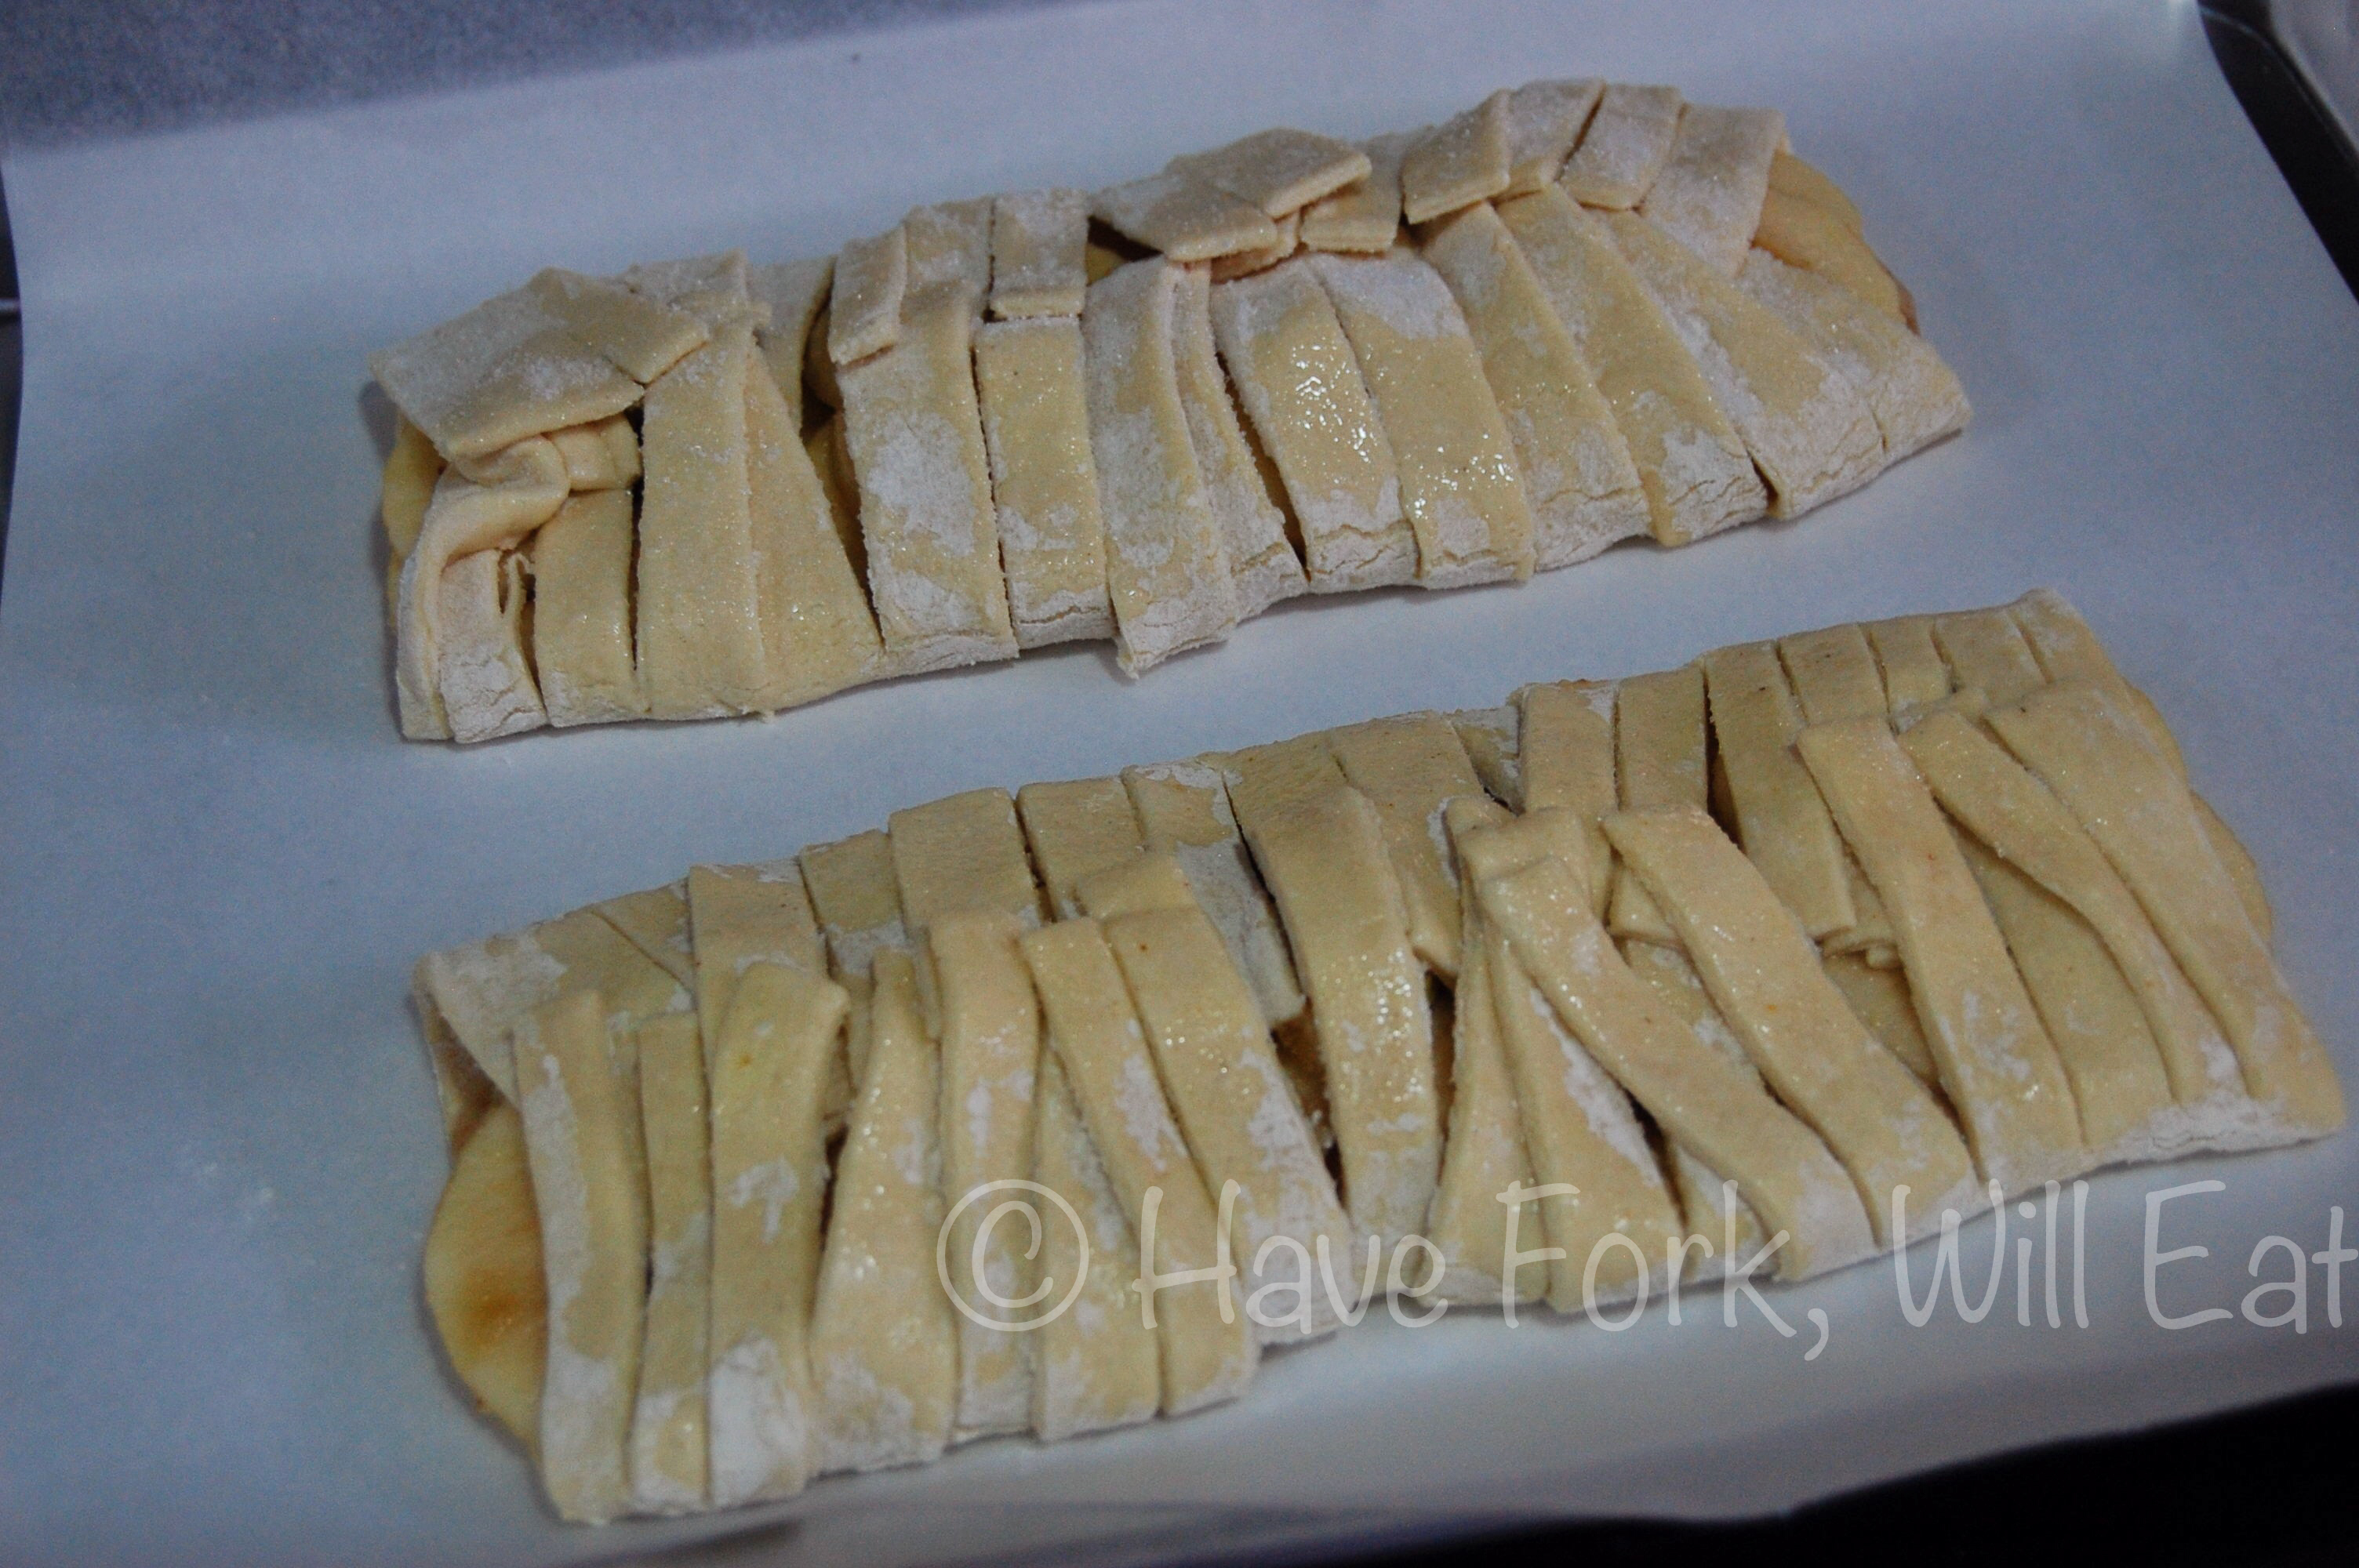
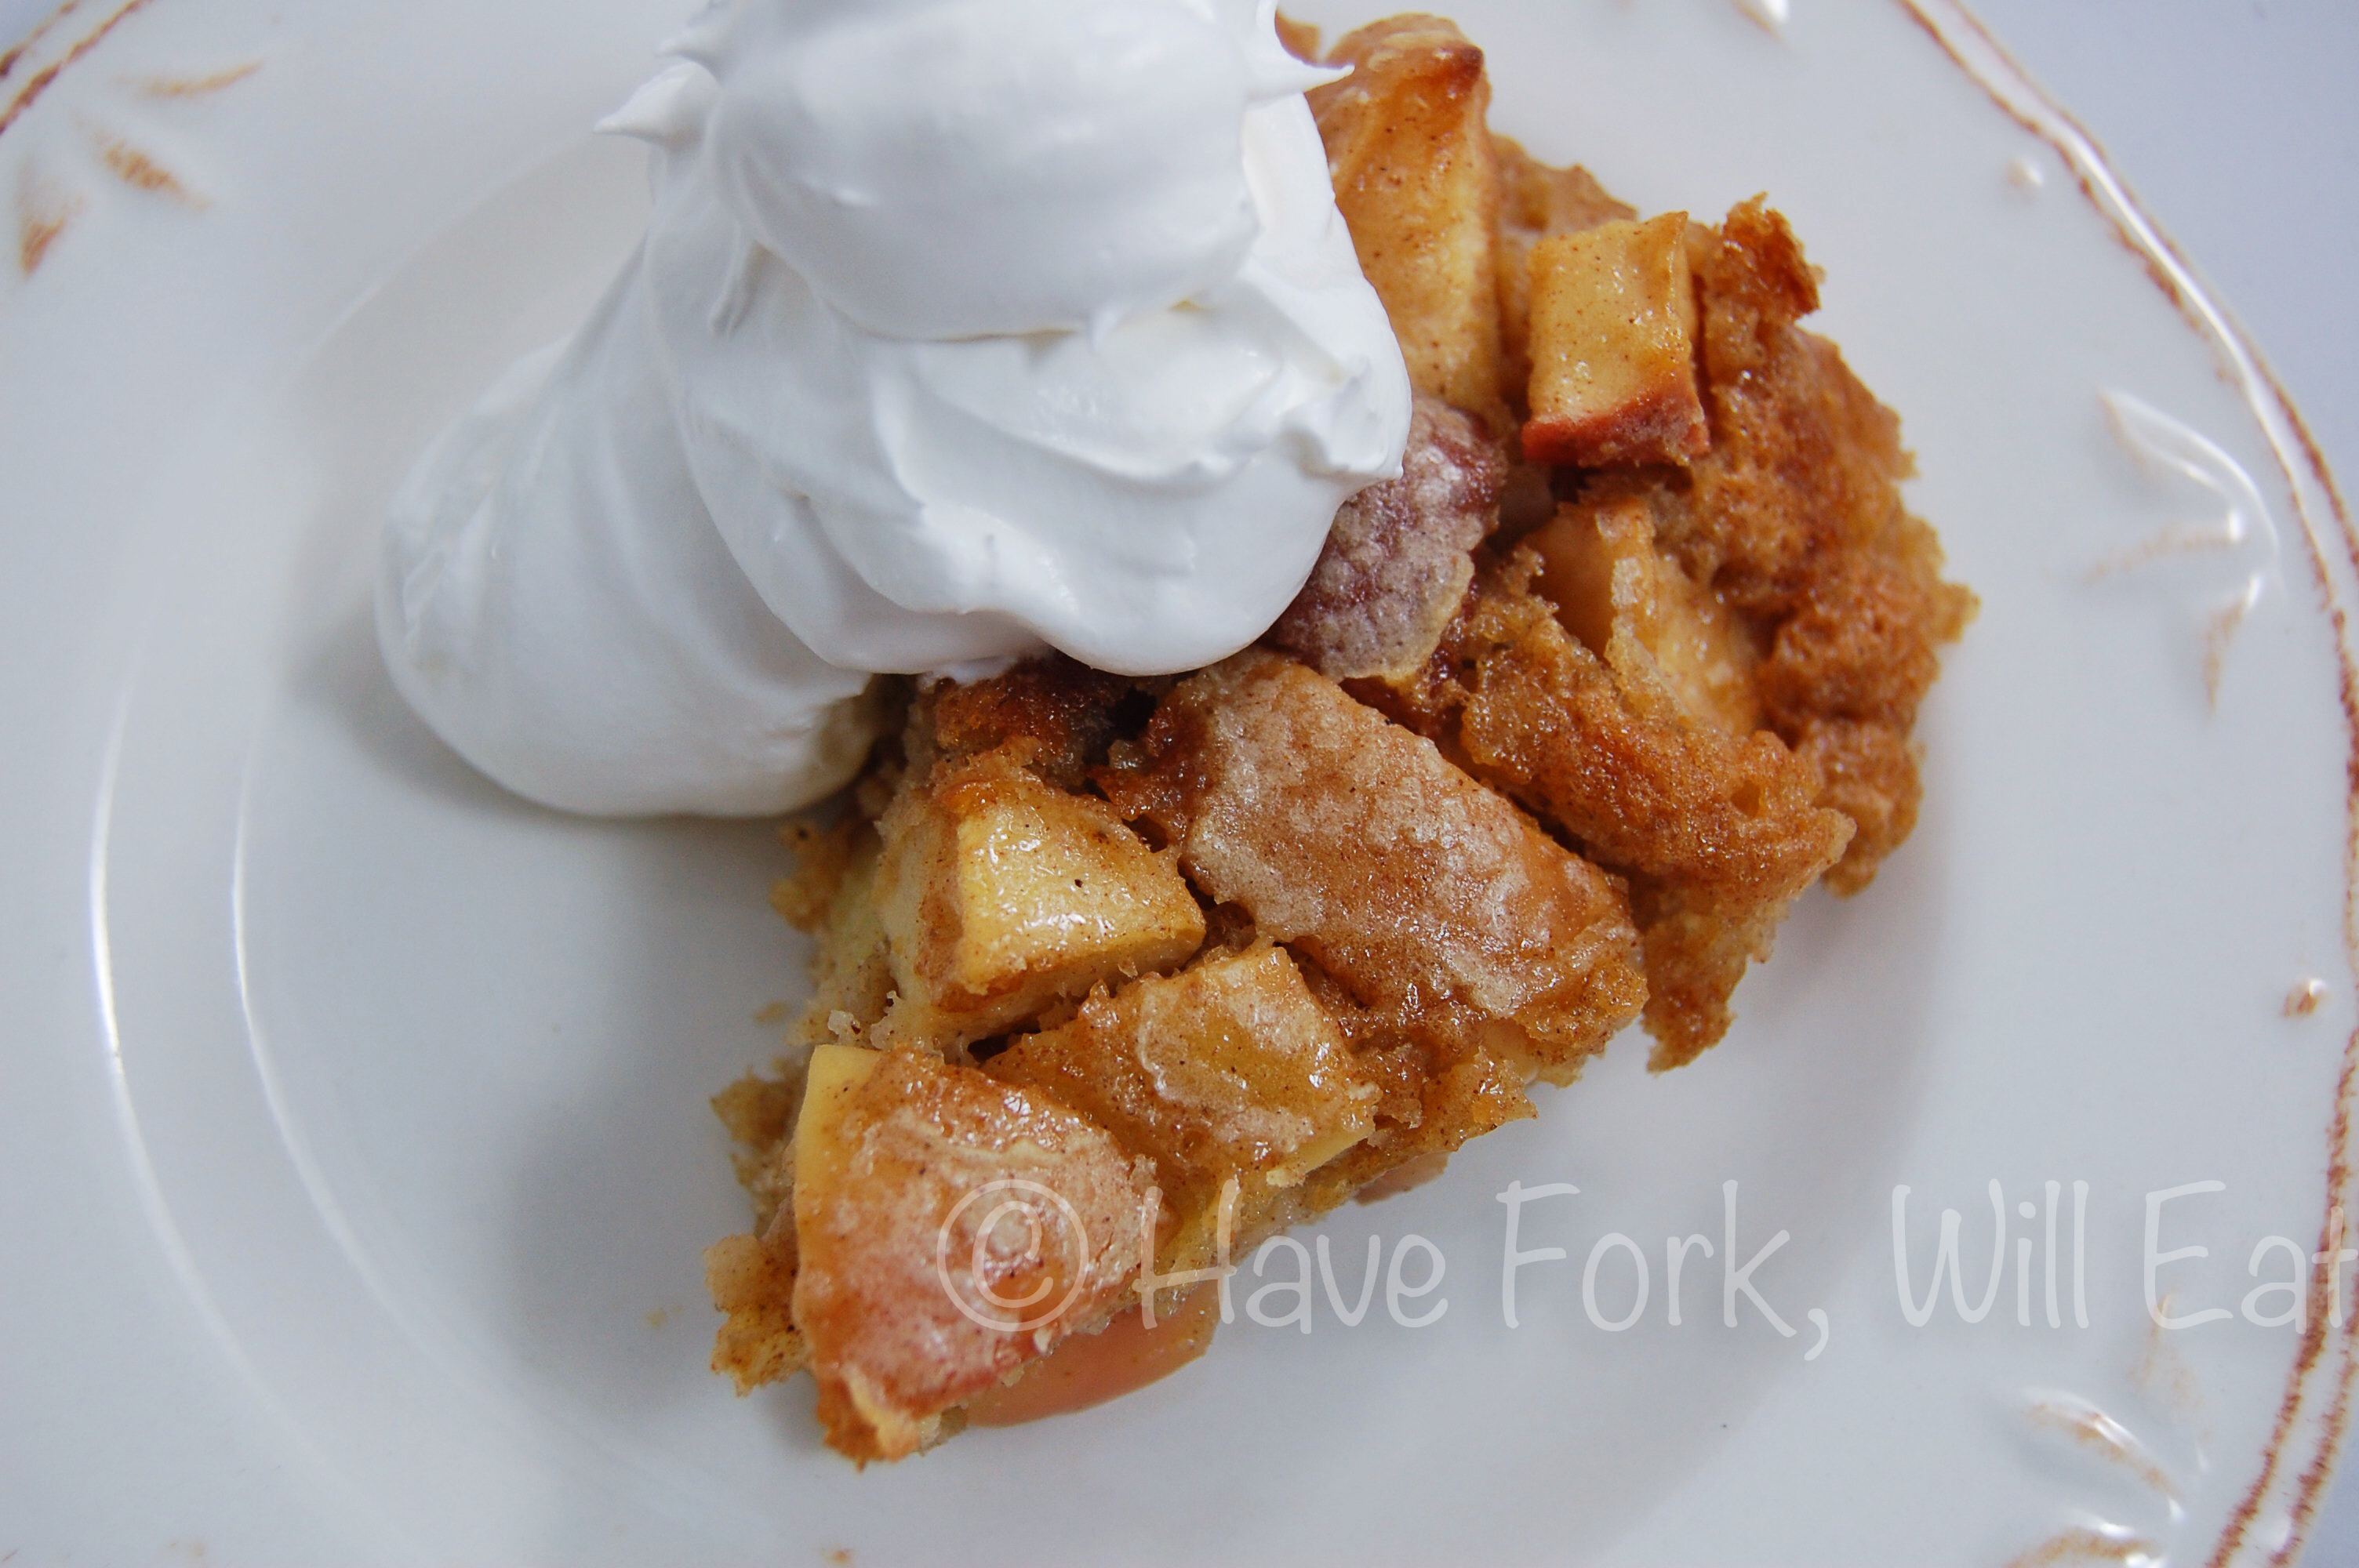
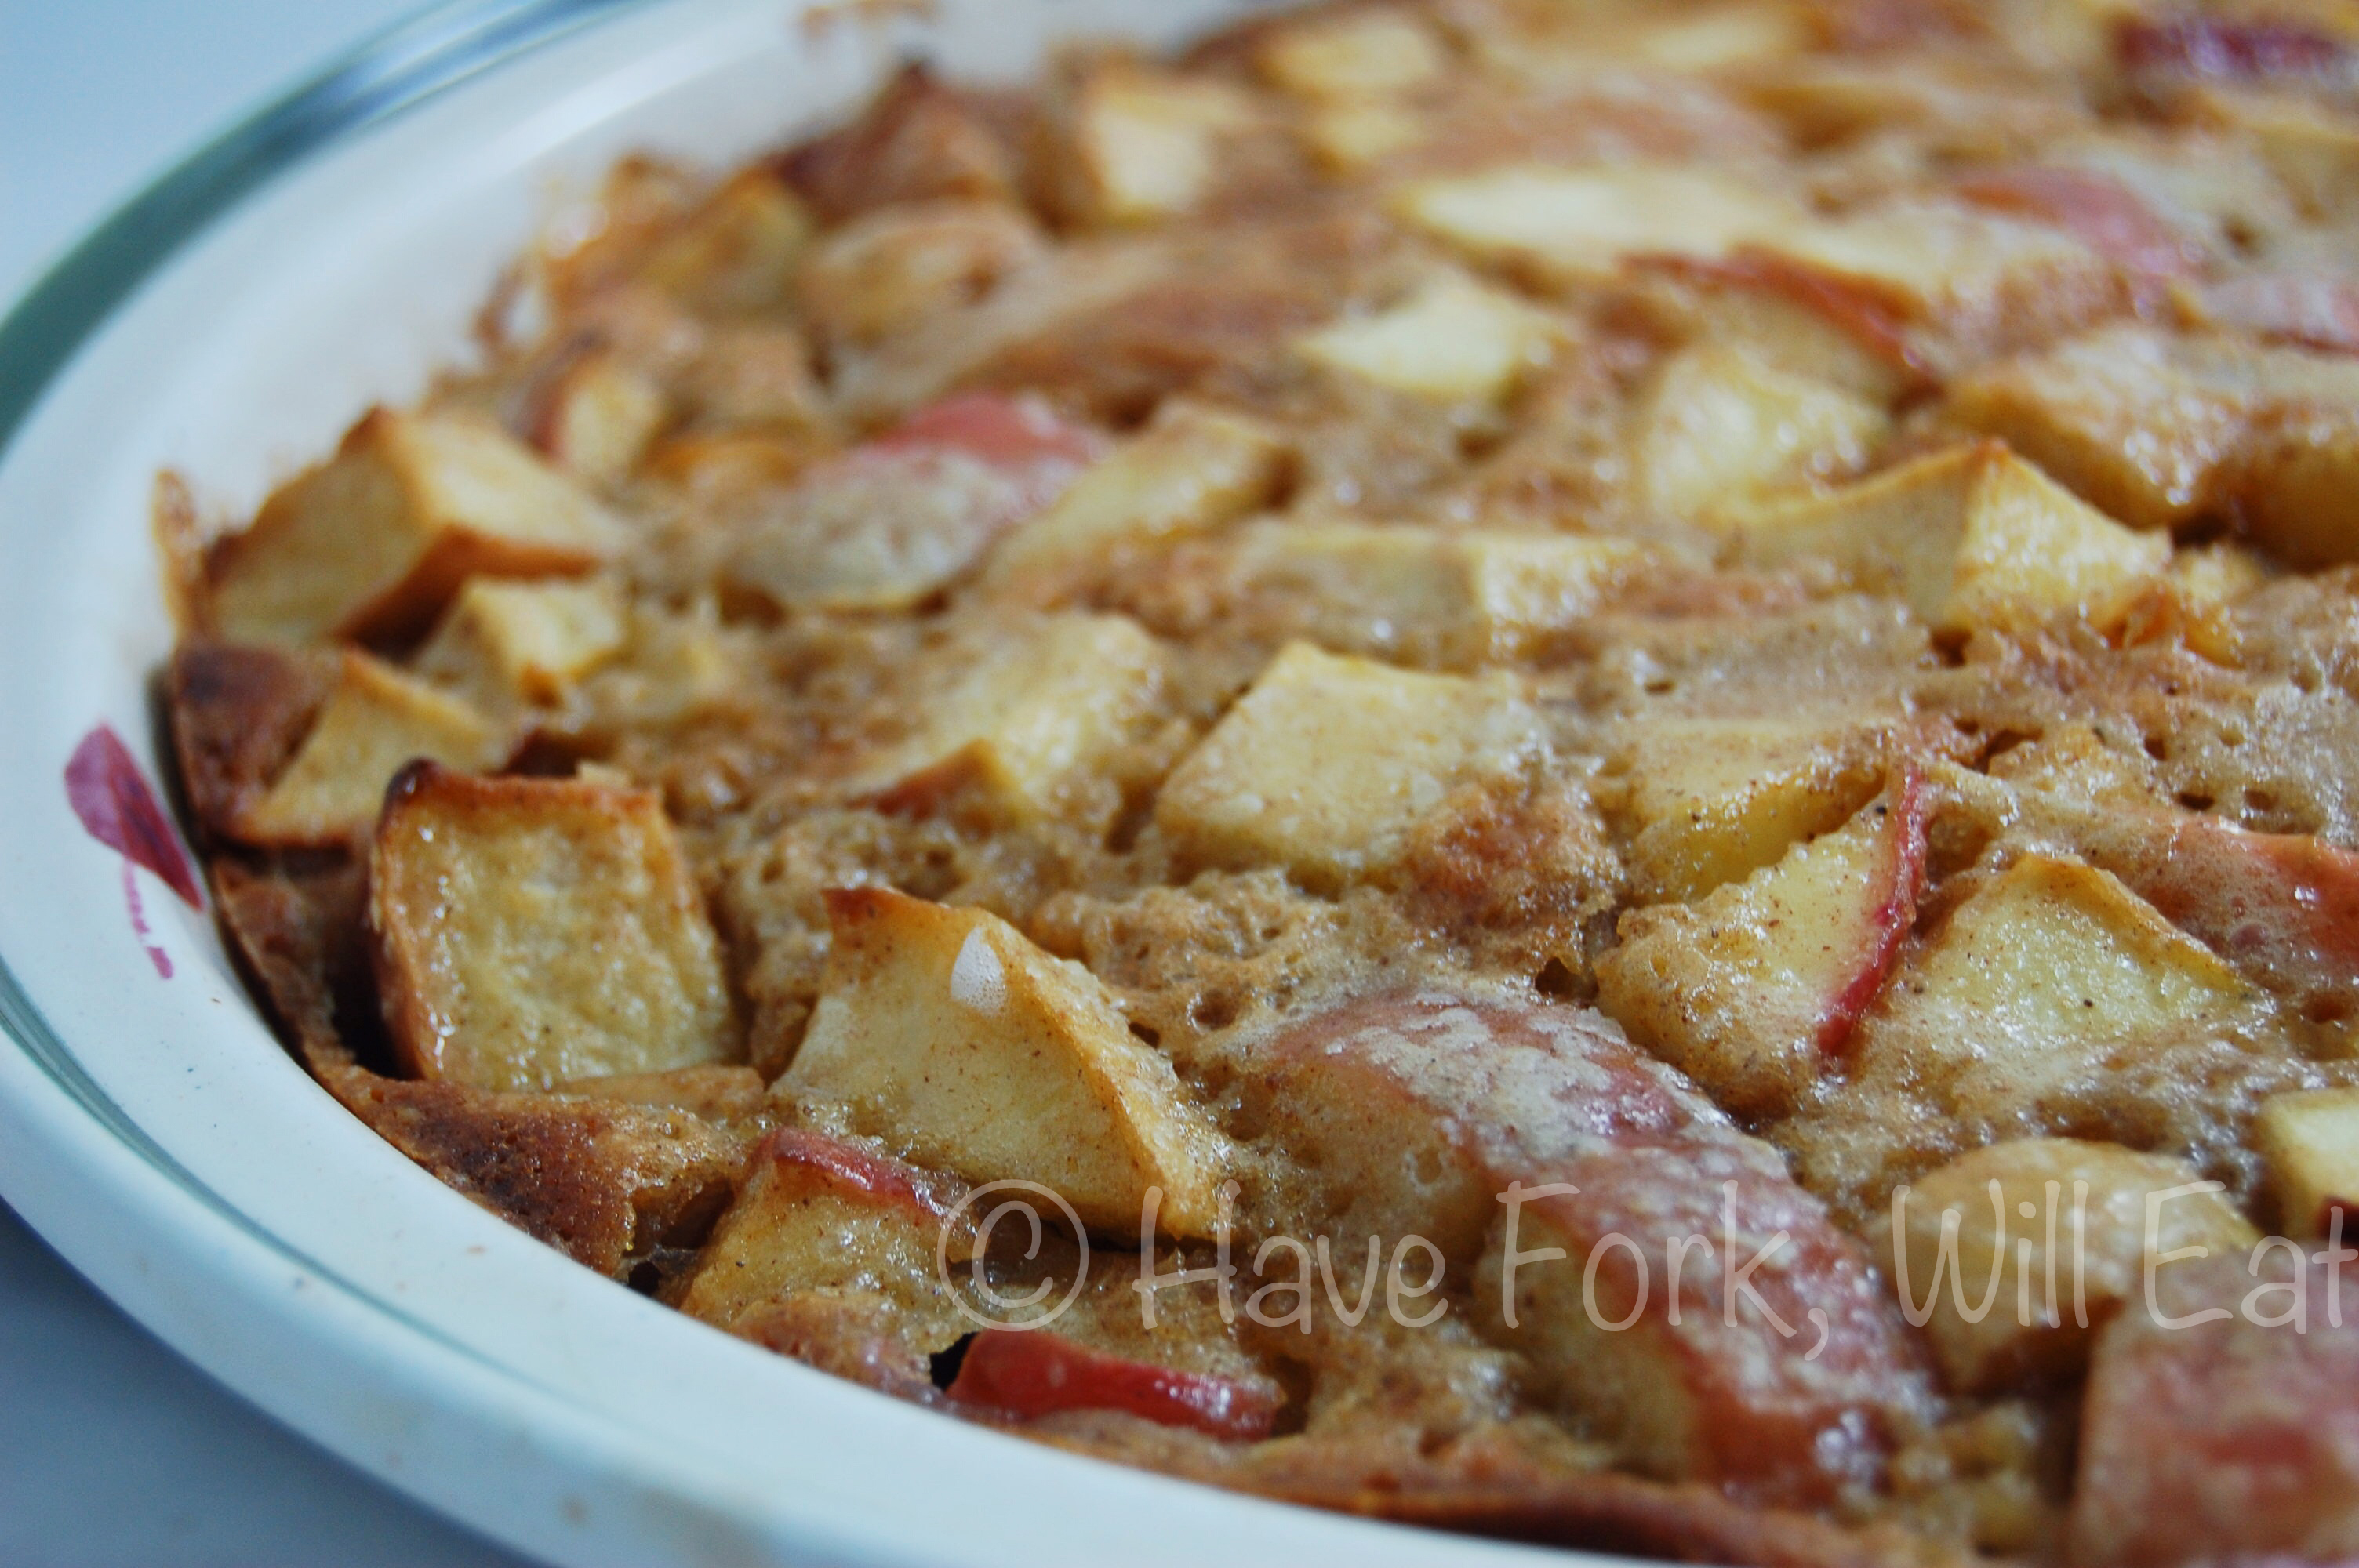
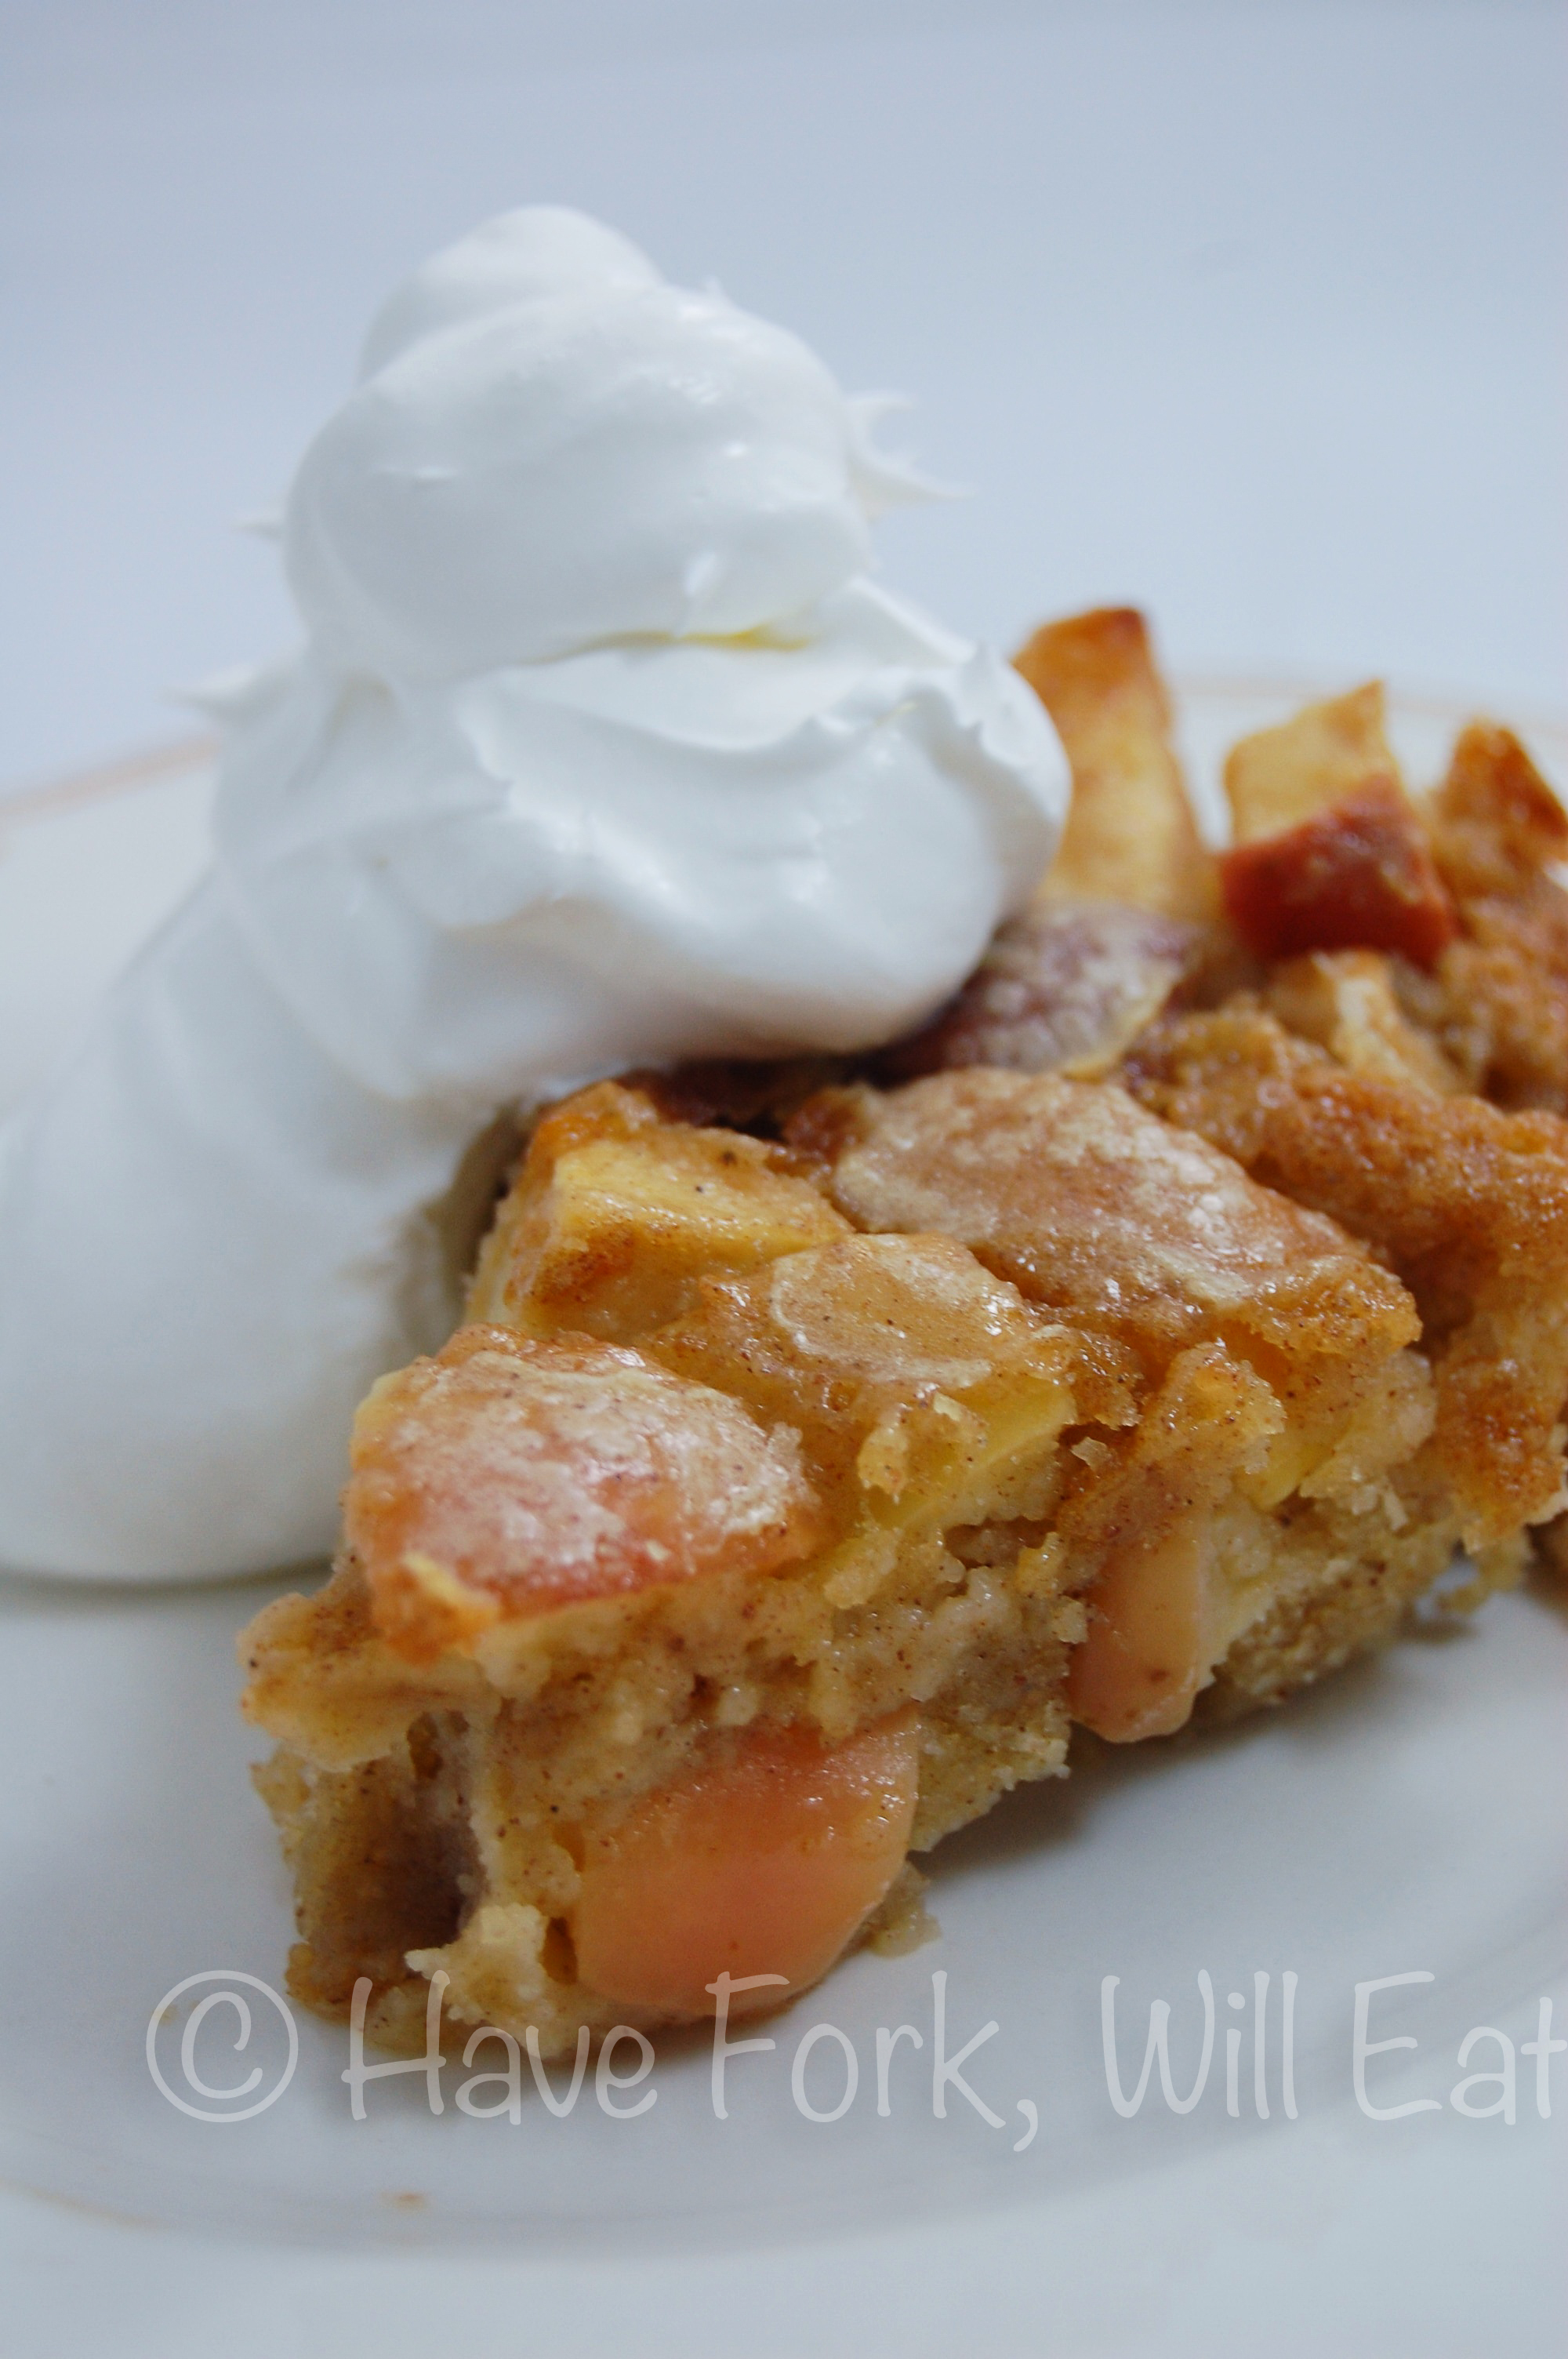
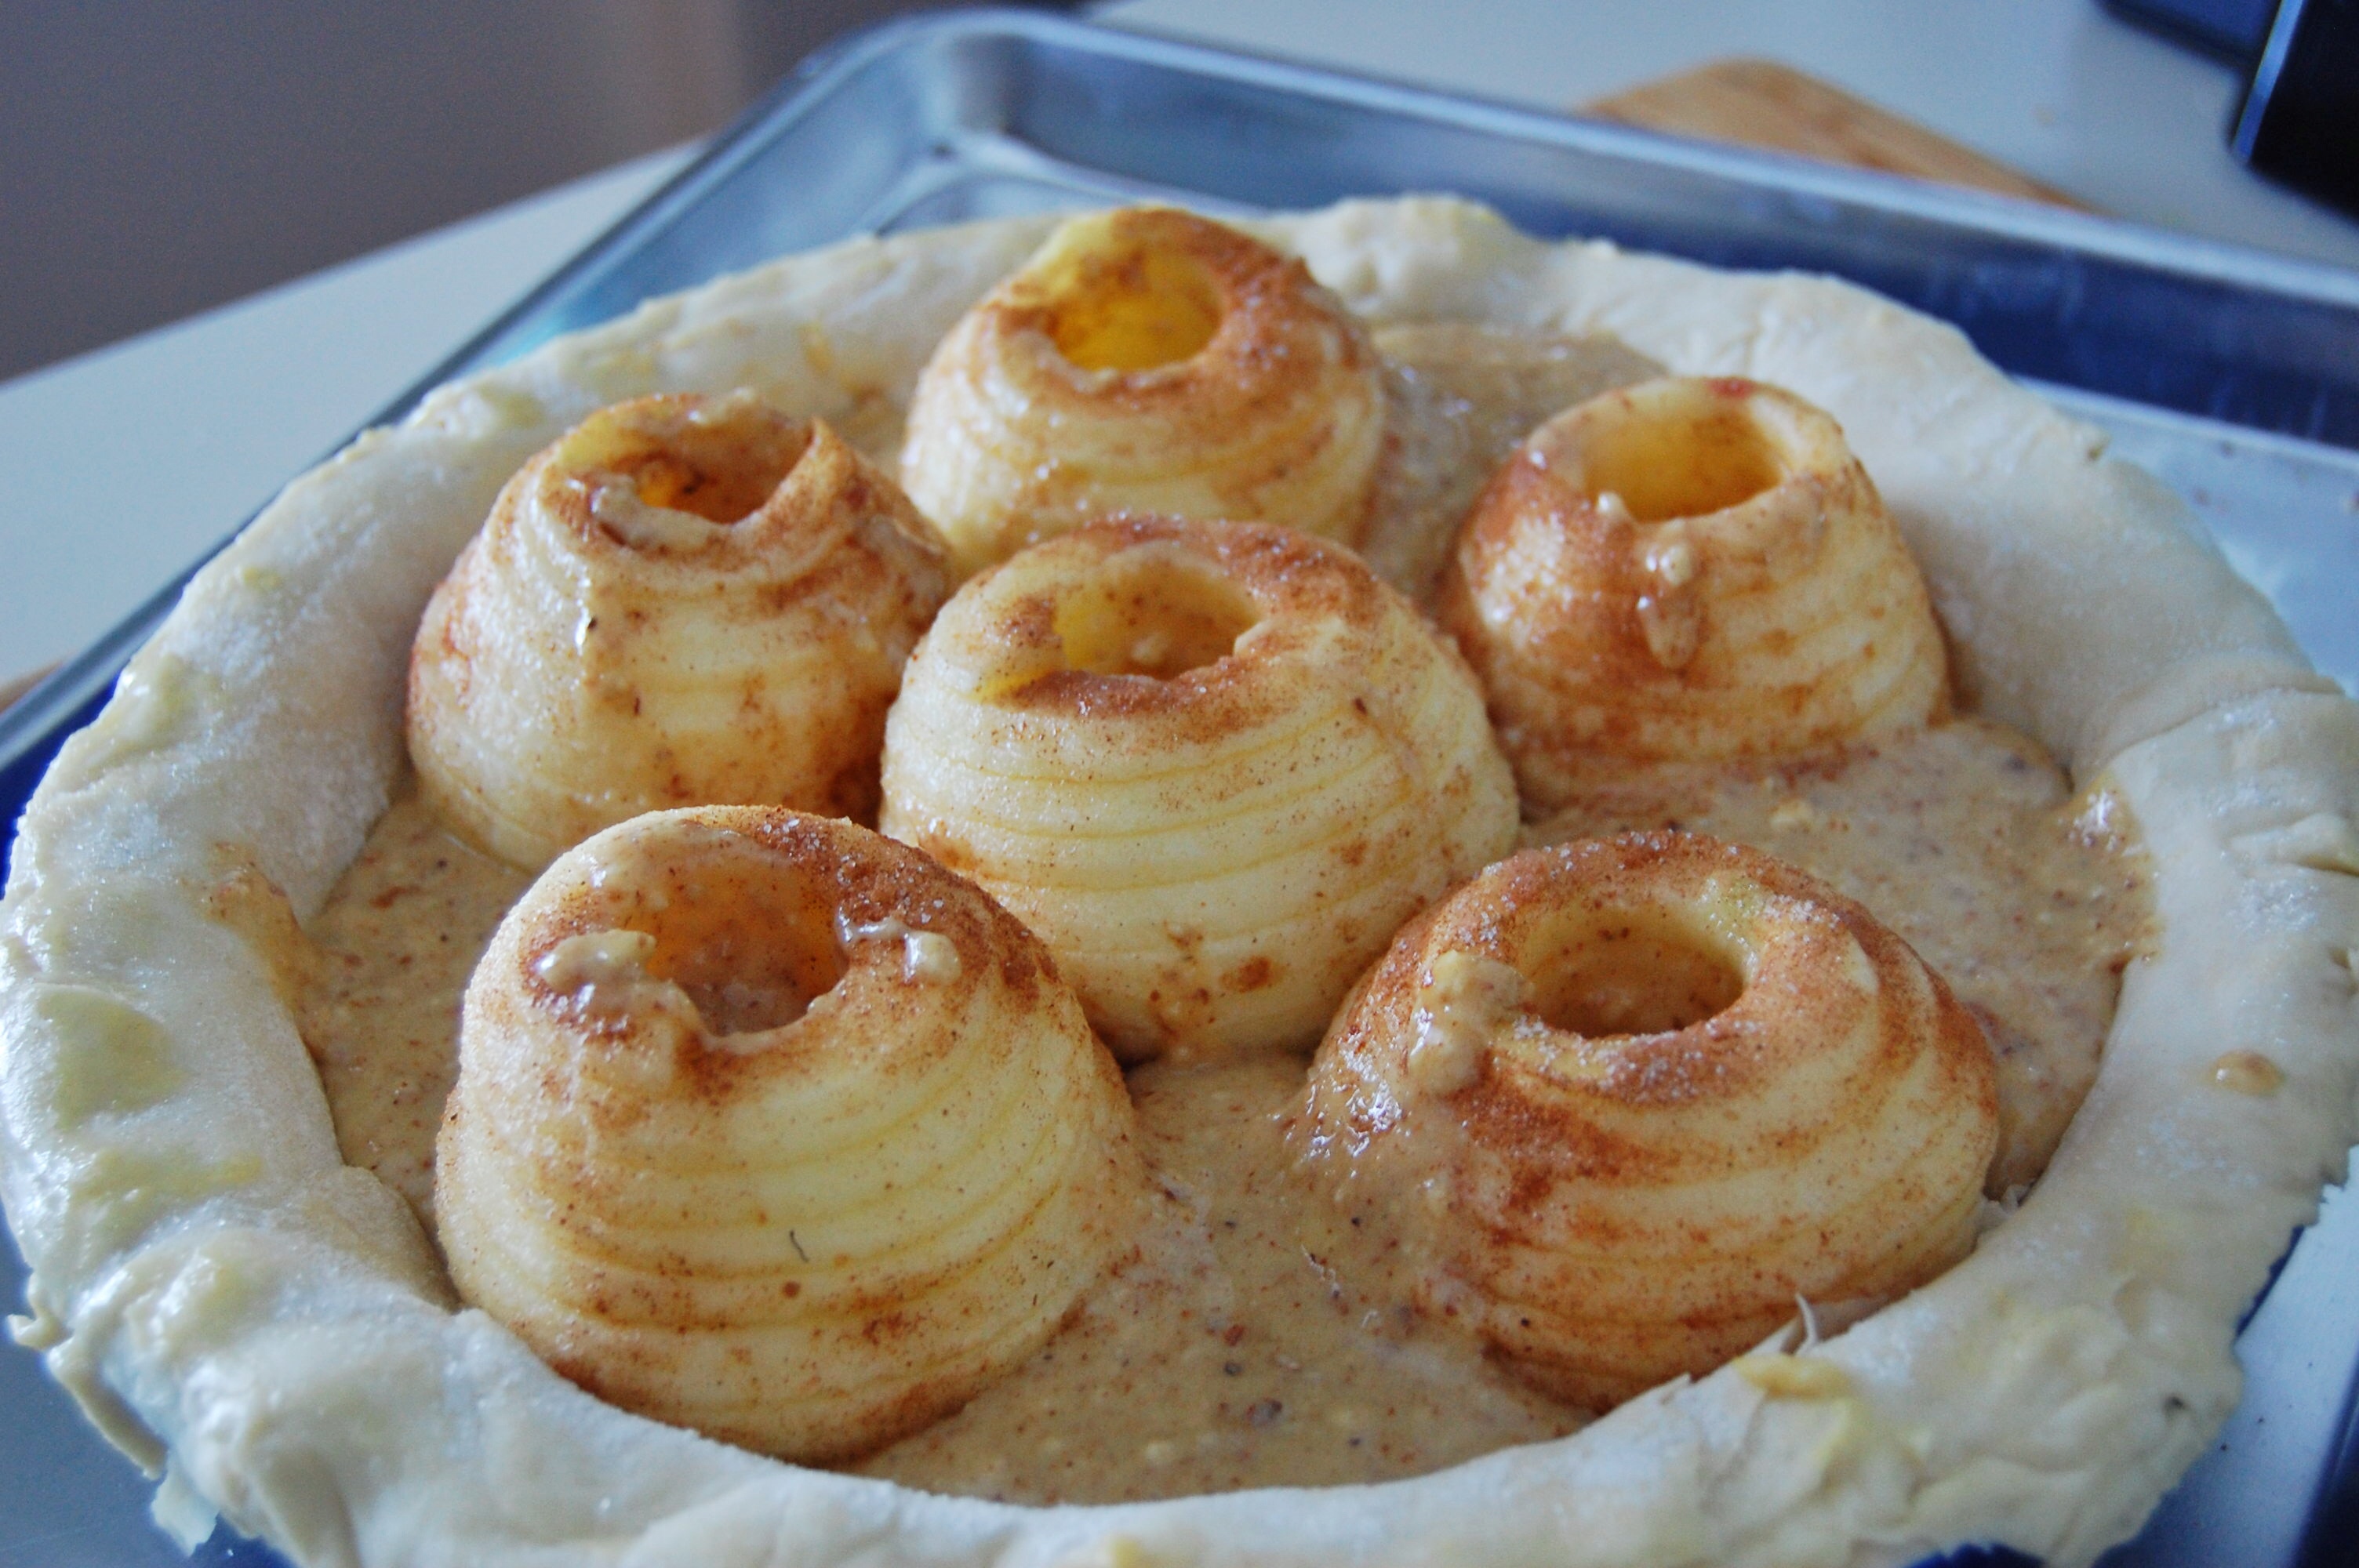
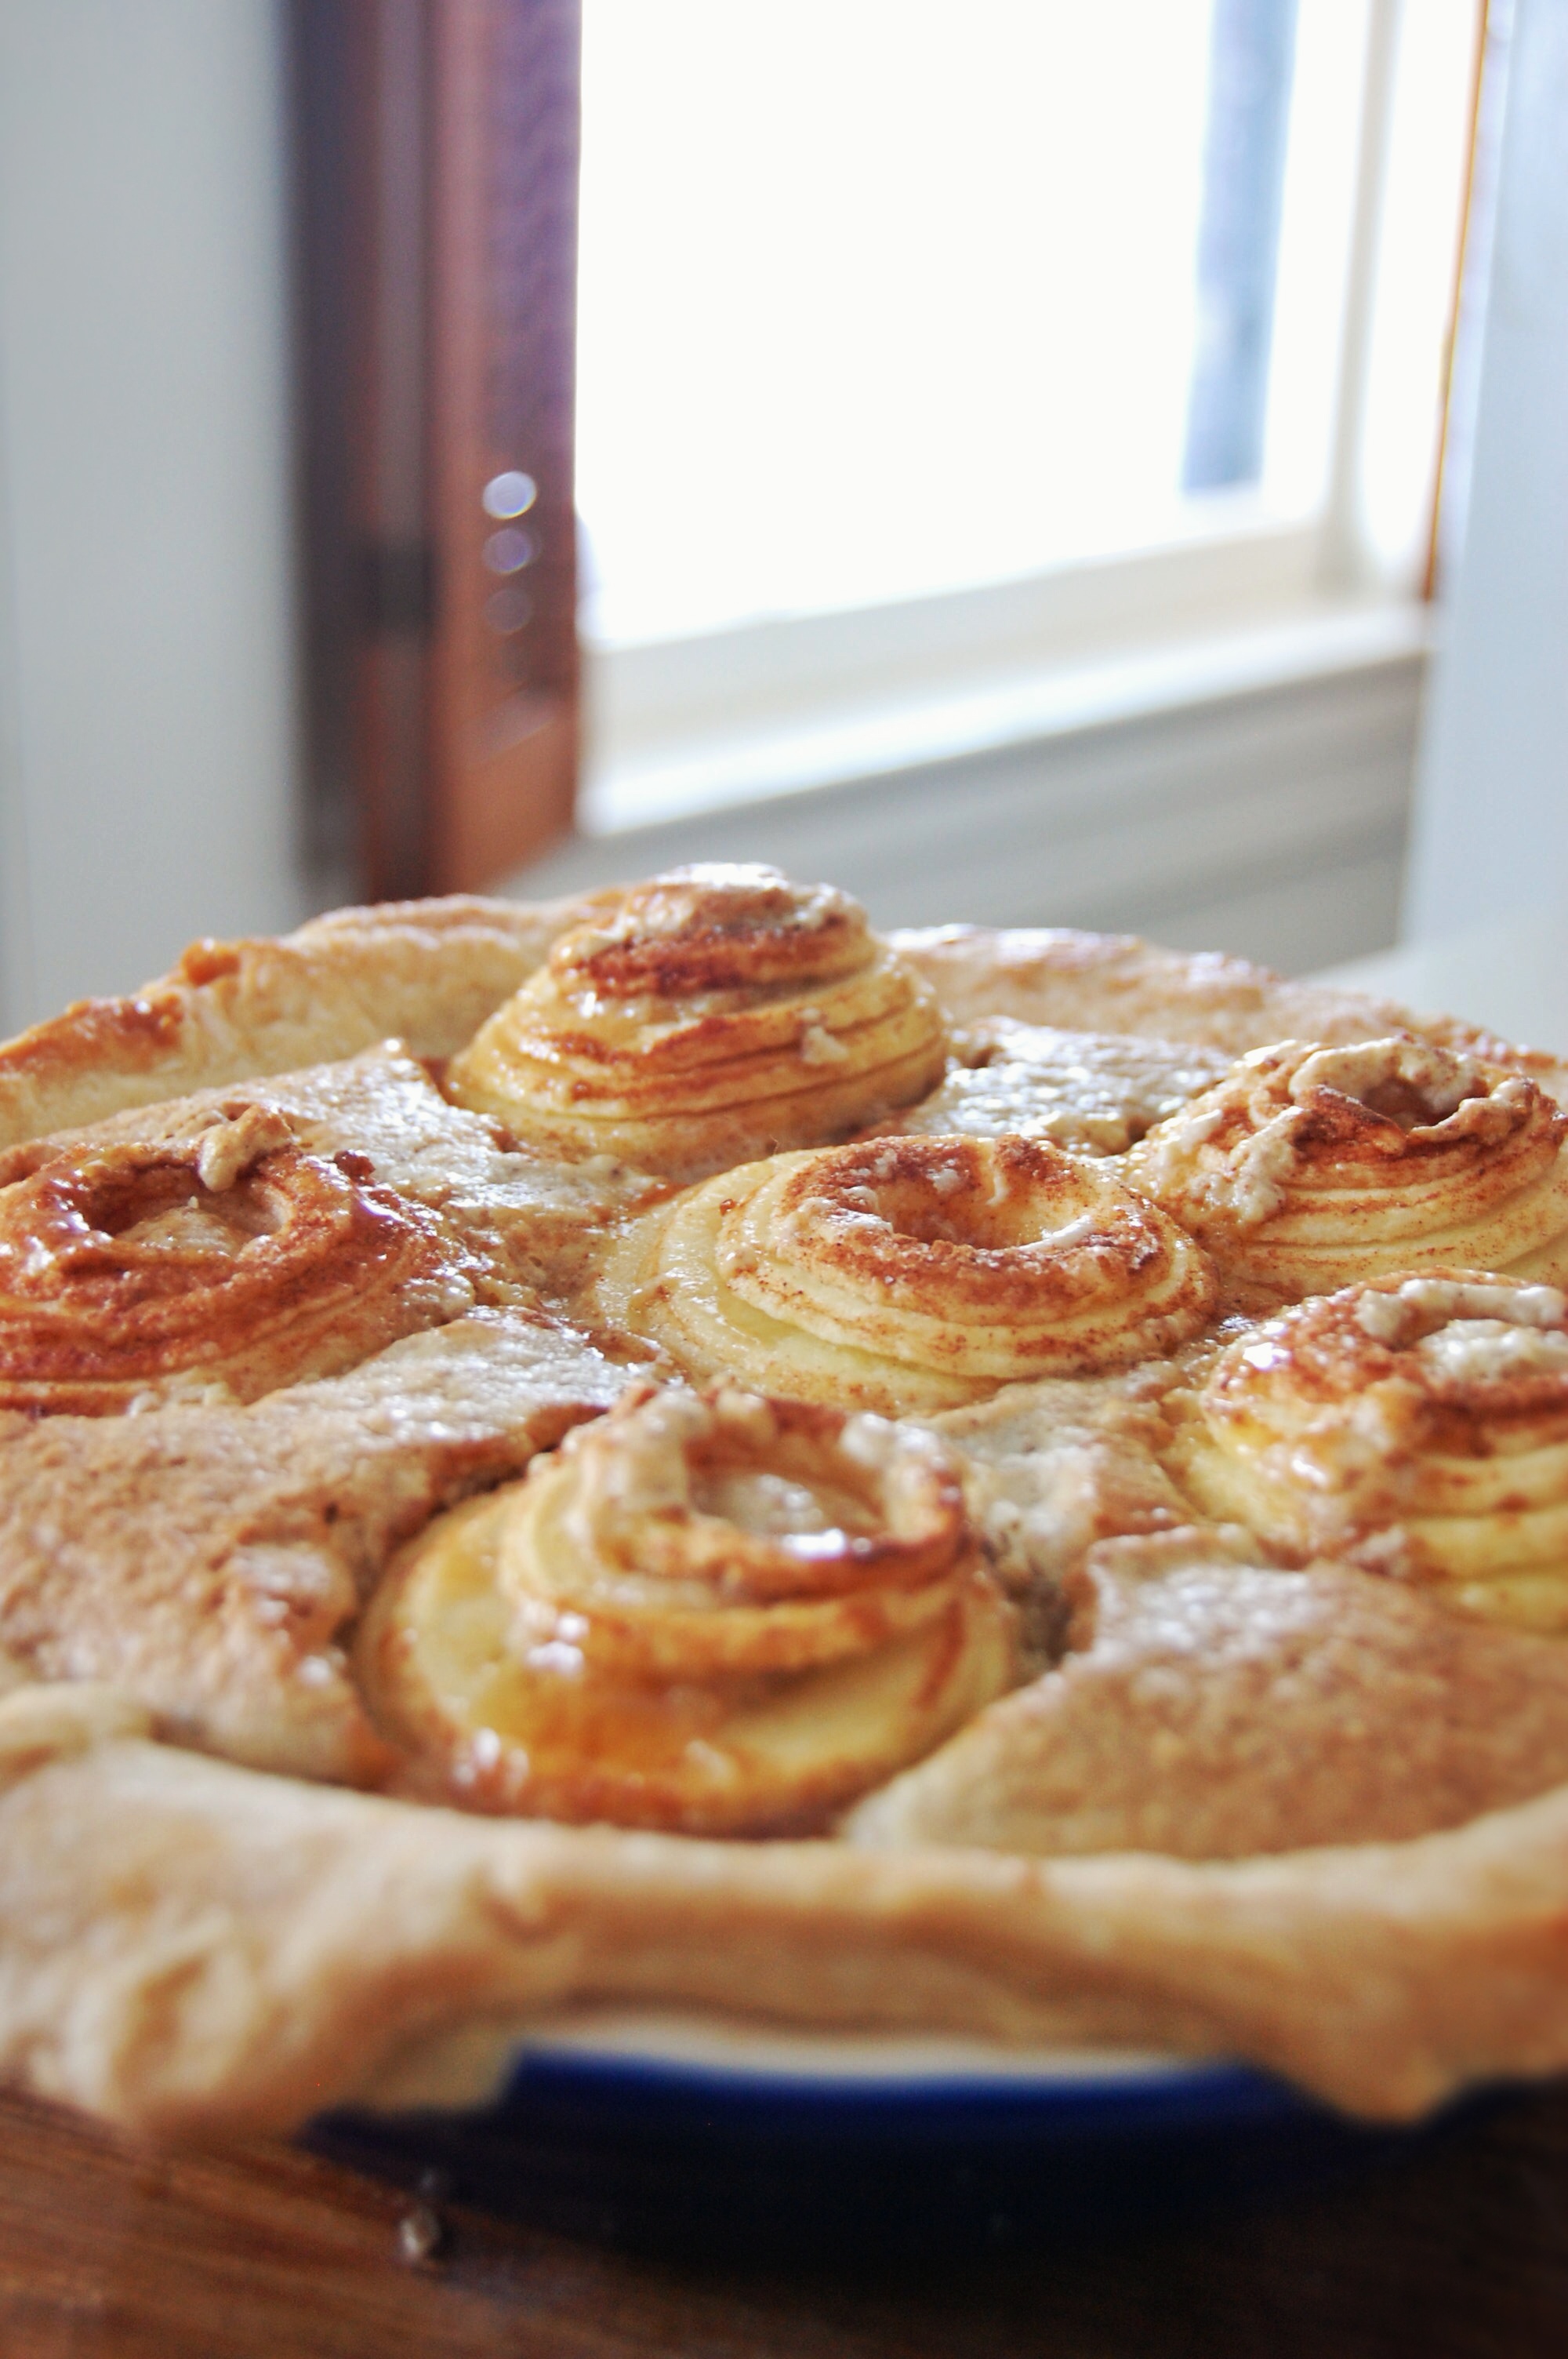
Anyway, it’s a riff off my apple almond tart.  I used a double batch of the same frangipane recipe.  I used Alton Brown’s butter/lard pie recipe for the crust.  And then for the apples, I used my old-school apple peeler/finger mangler thing (see below) to core, peel and spiral slice the apples.

The corer doesn’t fully slice the apples–all the pieces remain connected, so they’re “sliced” but actually still just one unit.  Then I sprinkled them with a mixture of brown sugar, white sugar, and cinnamon and let them sit for a few minutes.  Depending on the water content of your apple choice, you may want to let them sit for up to a half hour to get out the extra moisture.  I use honeycrisp apples, and they’ve been pretty solid.

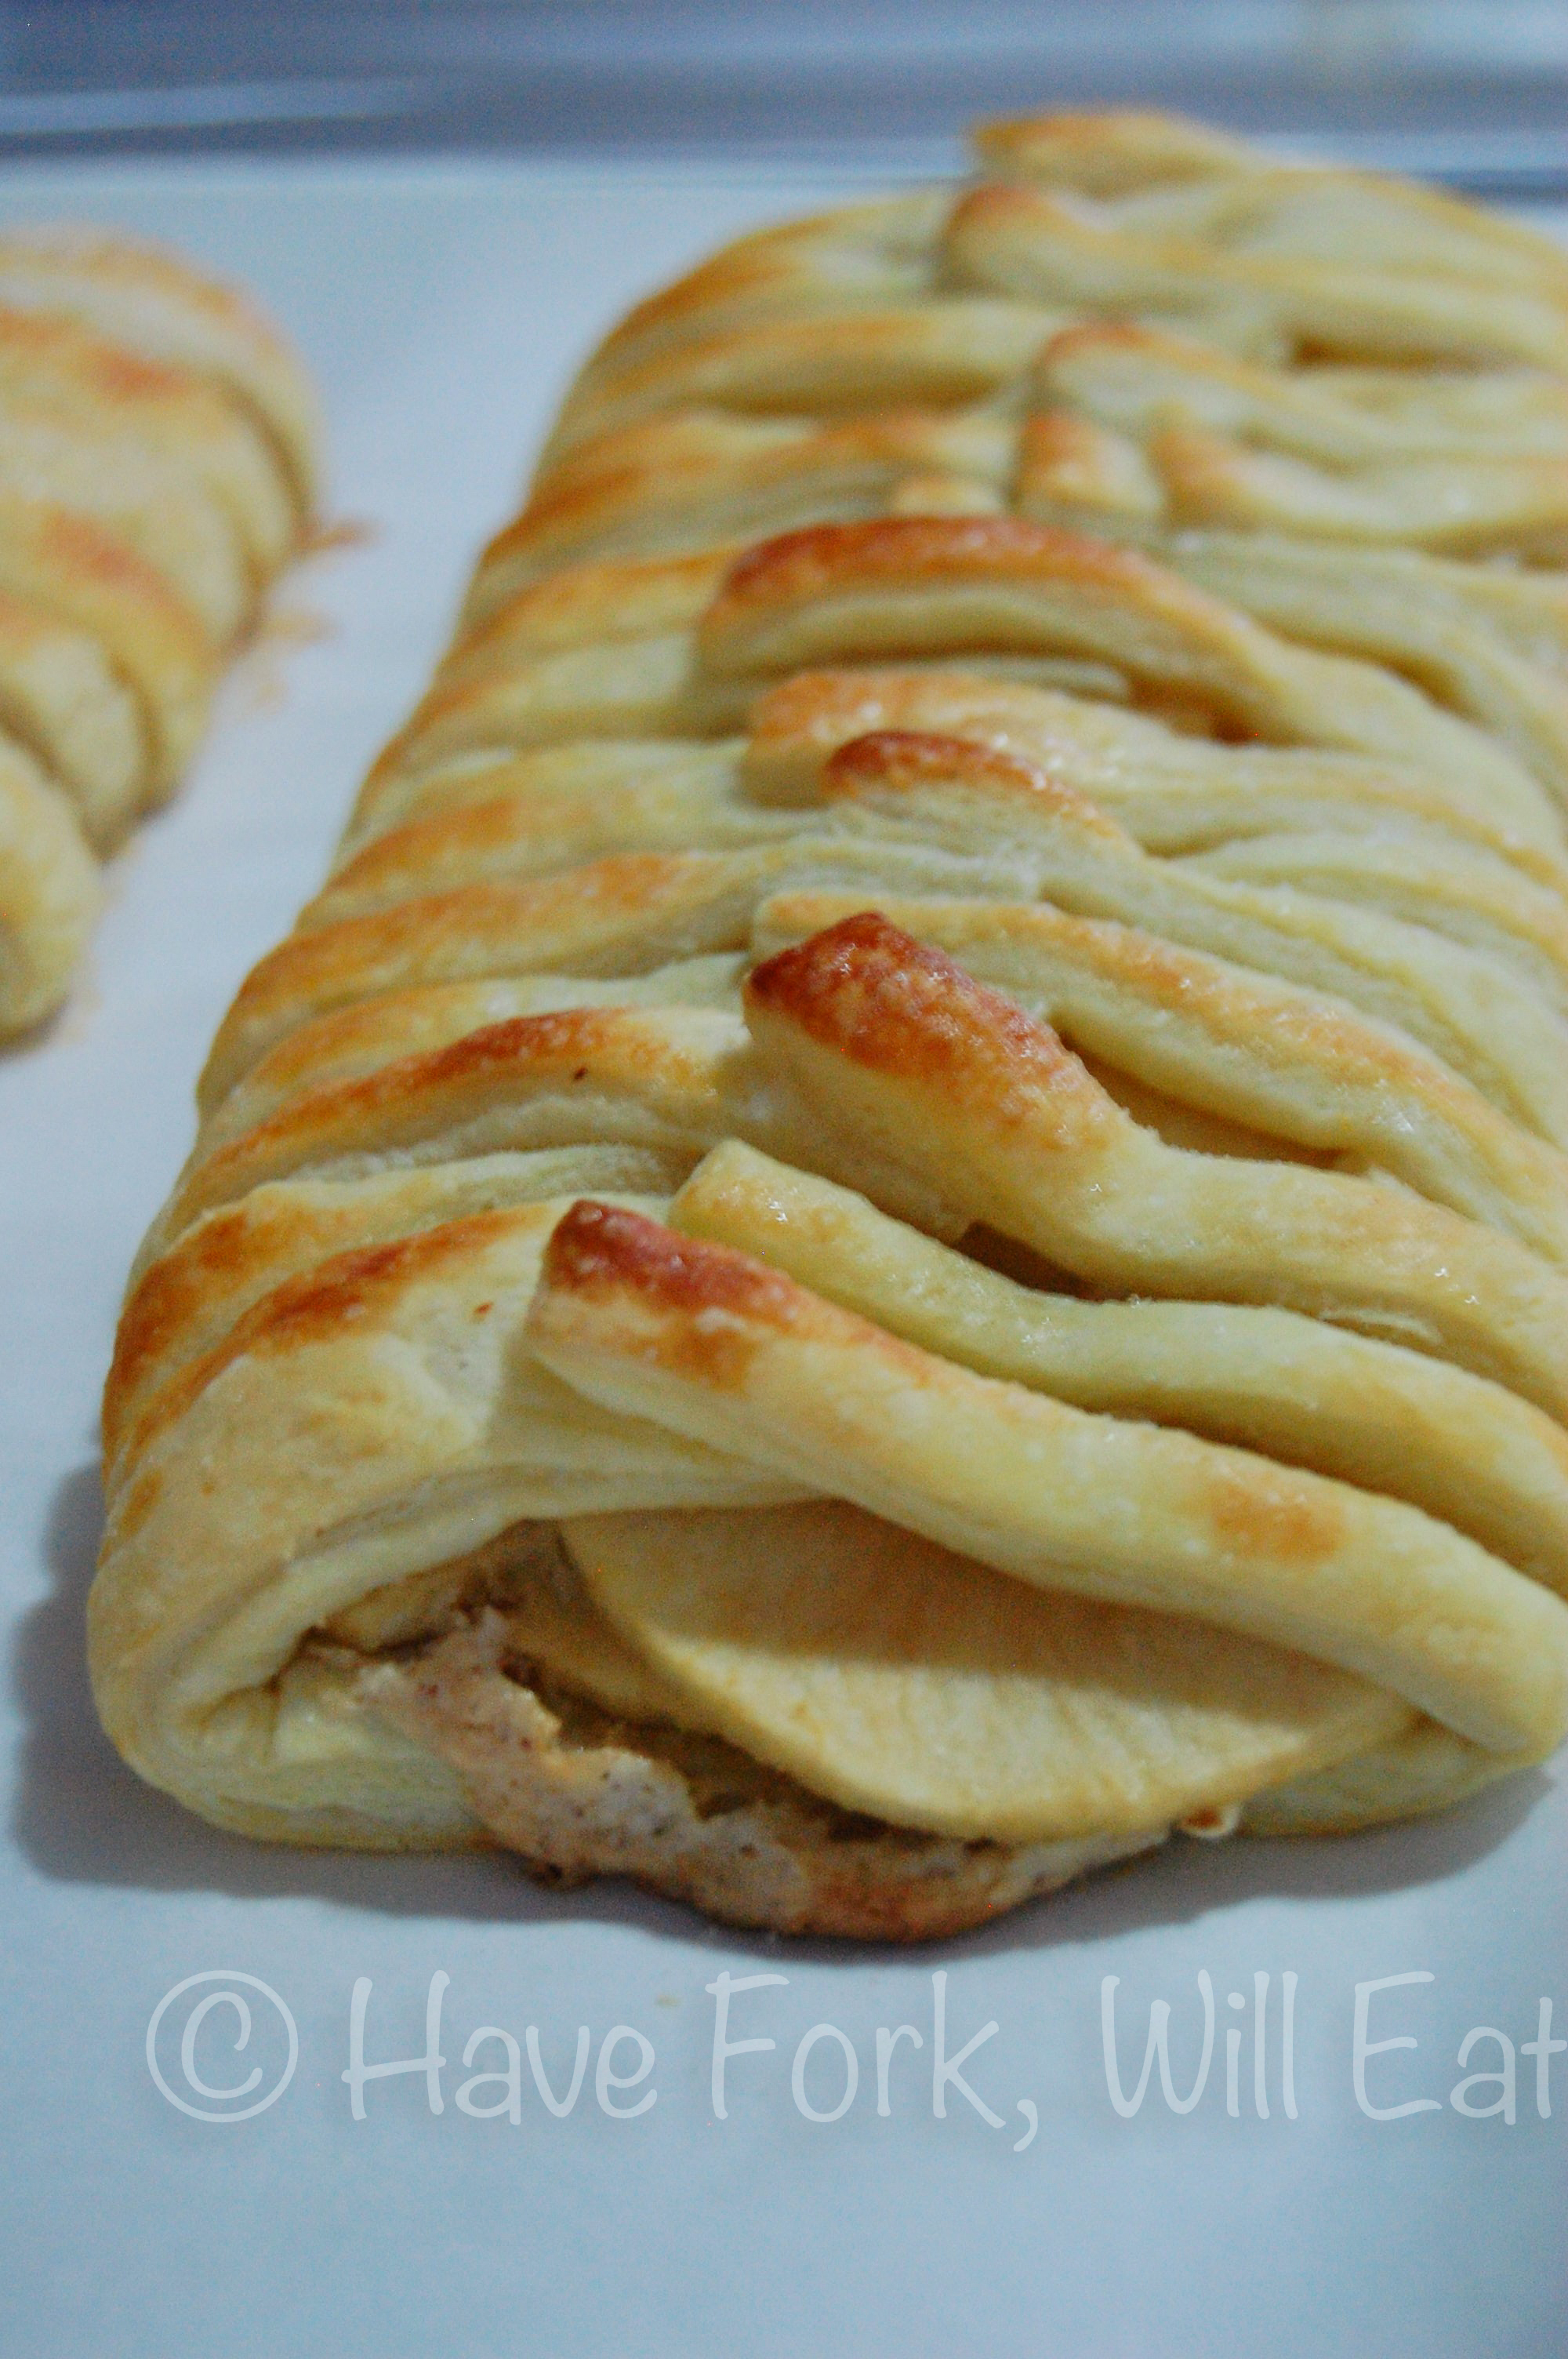
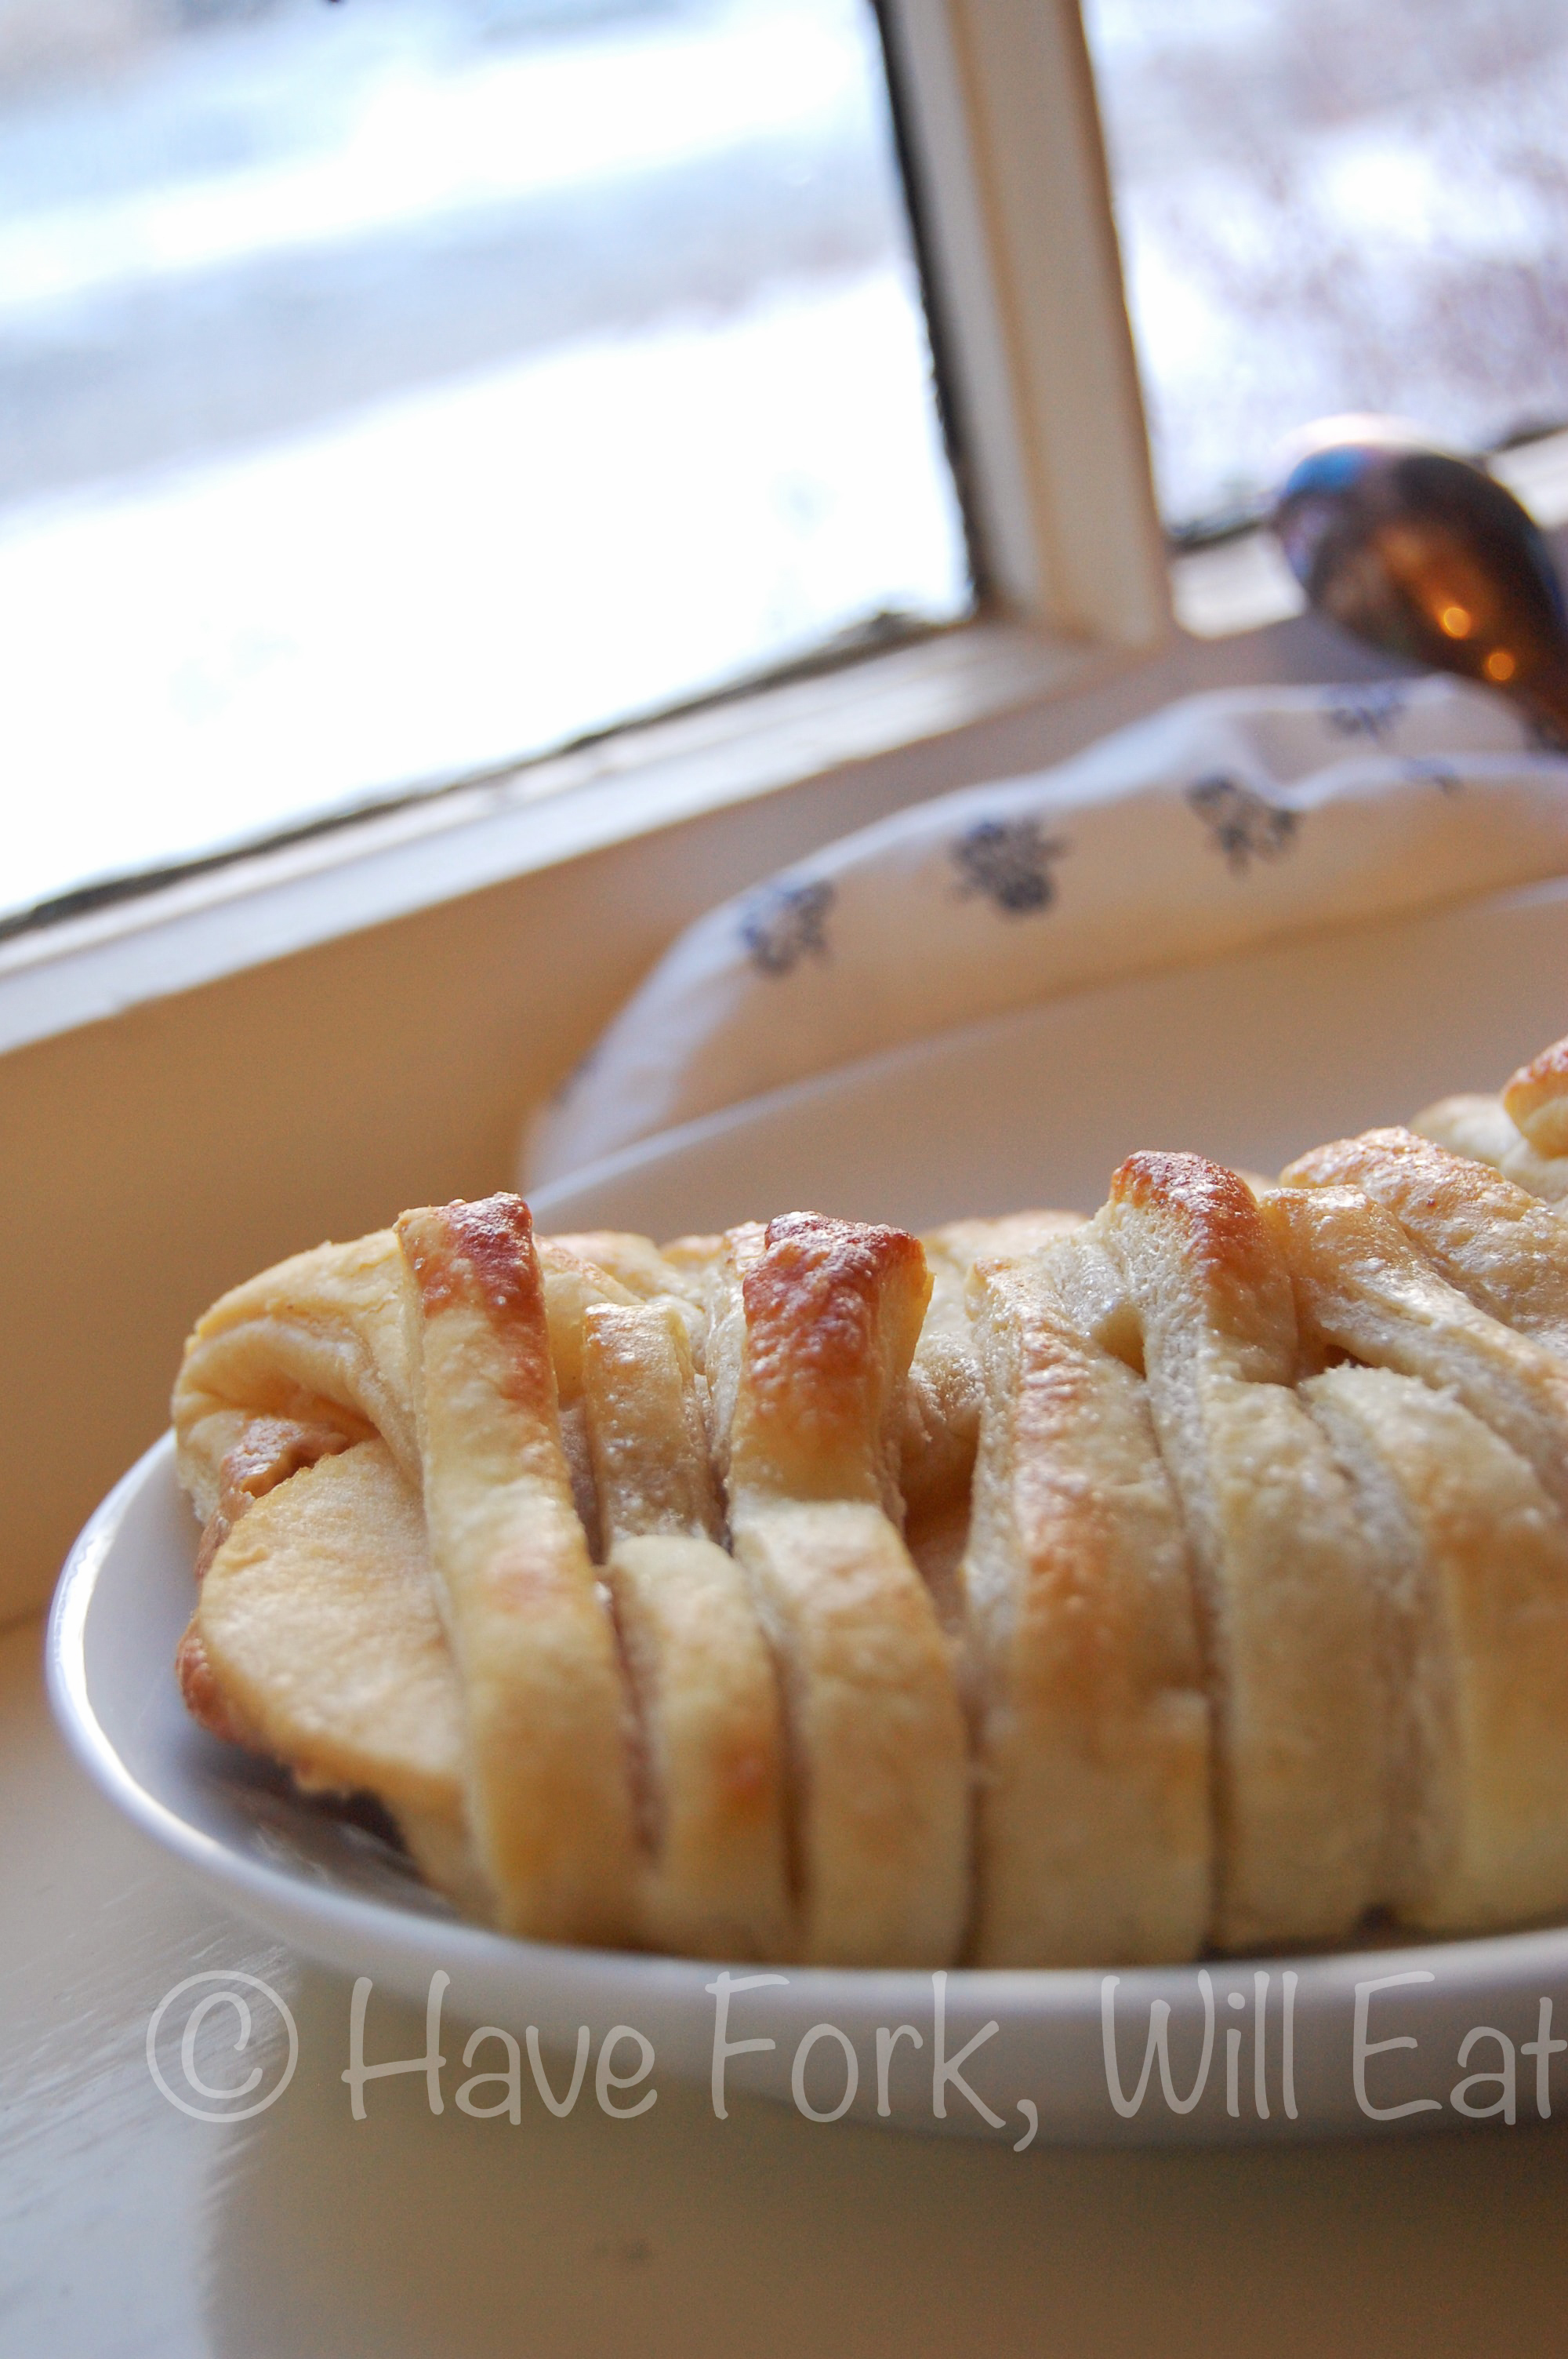
Anyway, I sat the apples in the pie crust and spooned the frangipane around them and added a little bit inside the apple as well.  Then I baked the pie for 30 minutes, covered the edges with tinfoil to prevent burning, and continued baking for another hour.  Then let the pie cool.

Yum.

Apple Frangipane Tart

I don’t know what the weather is like where you live, but where I live it’s like:

Hoth from Star Wars

This, of course, has caused me to retreat even further into the warm blankets on my couch.  It also has caused serious cravings for comfort food like a good warm, flaky pastry.

This one is particularly delightful because it’s made from ingredients I regularly keep on hand, and it takes very little effort to put together but it looks fancy, and that’s what’s important.  People see it, taste it, get impressed, and think I’m a better baker than I really am.  Score!

Apple Almond Tart

The pastry part is easy–two sheets of thawed puff pastry with the edges cut into strips.  The filling is a couple of apples peeled, cored, sliced, and marinated in a little amaretto and brown sugar, plus a layer of frangipane to glue it all together.

Apple Almond Tart Apple Almond Tart

Frangipane is an almond pastry cream made of ground almonds, sugar, butter and eggs.  Don’t feel intimidated by any of the previous words: it is extremely easy to make.  I use whole almonds and grind them in my food processor; if you don’t have a processor, buy ground almonds and use those.  The end product will still be delicious.

Apple Almond Tart

Apple Frangipane Tart

Ingredients

  • 2 sheets puff pastry

  • 2 apples, peeled/cored/sliced
  • 1/4 cup amaretto
  • 2 tbsp brown sugar

  • 1/2 cup whole almonds
  • 1/4 cup sugar
  • 1 egg
  • 3 tbsps soft butter
  • 1 tbsp flour

  • 1 egg
  • 1 tbsp water
  • extra sugar for sprinkling (optional)

Instructions

  1. Take the puff pastry out of the package, cover it with a kitchen towel, and let it thaw and come up to room temperature.
  2. Put the apples in a large ziplock bag with the amaretto and sugar, tossing to coat. Let marinate for at least 30 minutes, turning the bag over occasionally.
  3. Preheat the oven to 350F.
  4. Put the almonds and sugar into a food processor and pulse until relatively finely ground. Add in the butter, egg, and flour. Mix until you get a grainy creamy consistency.
  5. Drain the apple slices.
  6. Sprinkle a little flour down on the counter and lay down the first sheet of puff pastry. Roll it out a little bit to smooth over any creases. Carefully move the dough to a baking sheet that has been prepared with some parchment paper.
  7. Spread about half of the frangipane down the middle third of the pastry. Top it with about two layers of sliced apples.
  8. Take a knife or a pizza cutter and cut both sides of the pastry perpendicular to the frangipane into strips, stopping about a half inch away from the frangipane. Fold the strips over the top of the apples.
  9. Beat the egg with the water to make an egg wash. Brush the egg wash over the pastry. Sprinkle it with a bit of sugar (optional).
  10. Repeat the process with the other puff pastry sheet.
  11. Bake the tarts in the oven for about 20 minutes, or until the pasty is browned and set. Let cool, slice, and serve.
http://haveforkwilleat.com/2014/01/apple-frangipane-tart/

The Great Food Blogger Cookie Swap: Chocolate Orange Pecan Shortbread

I mentioned in the last post that I was excited about three things this week.  One of those is tonight’s Live Organize Your Kitchen with Evernote hangout with fellow Ambassador and food blogger, Brandie Kajino.  The other was cookie swaps.

DSC_0017

Specifically, the annual Great Food Blogger Cookie Swap.  I do enjoy participating in it every year.  If you haven’t heard about it, it’s organized by Love & Olive Oil and The Little Kitchen.  Food bloggers all over the country sign up and donate their sign-up fee to Cookies for Kids Cancer.  We get matched with three other food bloggers and we have to make a new-to-us cookie recipe and send a dozen of them to our matches.  In return, we receive three different batches of cookies to enjoy.  It’s a lot of fun, because who doesn’t like to get cookies in the mail?  If you want to join the cookie swap next year, go here to sign up on the mailing list.

This year, I got a delightful selection of truly diverse and delicious cookies.


Check out Lynn and Katie at:
Turnips2Tangerines
Blonde Ambition

The cookies I decided to make were chocolate shortbread, based off a recipe I got from The View from the Great Island.  I decided to go double chocolate, though not dark, and add in a bright citrusy flavor with a bit of Grand Marnier and orange zest.  And then, while I was at it, why not a bit of crunch with some chopped pecans?  I love orange and pecan together.

So here’s my revised recipe.  Enjoy!

Chocolate Orange Pecan Shortbread

Ingredients

  • 1/2 cup butter, softened
  • 1/4 cup powdered sugar
  • 3/4 cup flour
  • 1/4 cup cocoa powder
  • 1/2 cup semisweet chocolate chips
  • 1/4 cup chopped pecans
  • 1 tbsp Grand Marnier
  • the zest of one orange

Instructions

  1. Pulse the flour, sugar and cocoa powder in a food processor until well-mixed. Add in the butter, Grand Marnier and orange zest until the dough just comes together. Add in the chocolate chips and pecans and pulse a few more times until they are incorporated.
  2. Dump the dough out onto a piece of cling wrap. Shape it into a log, wrap it securely and refrigerate it for at least an hour.
  3. Preheat the oven to 325F. Take the dough out of the fridge, unwrap it, and slice it into half inch slices with a sharp knife.
  4. Put the slices on a parchment-lined baking sheet and bake for about 15 minutes. They'll still be a bit soft at the end.
  5. Let them cool and then enjoy!
http://haveforkwilleat.com/2013/12/the-great-food-blogger-cookie-swap-chocolate-orange-pecan-shortbread/

I said, brrr..it’s cold in here…

I’m resisting the urge to embed videos of Bring It On into this post.  It’s difficult for me, because you know how I feel about pop culture references.  I love them so much.

And also, it really is cold here.  Those of you in warm climates just don’t know my pain.  For the rest of you, I’m just gonna put this here…

And for bonus dipping action!

Mushroom Mac & Cheese with Portobello “Bacon” and French Bread Crumbles

Mac & cheese is one of the happiest dishes there is.  I know what you’re thinking: “That’s just like…your opinion, man.”  Well, it is.  And I love it when I’m right.

Chanterelle Mac and Cheese with Portobello Bacon and French Brea

This one is particularly good because it’s full of mushroomy deliciousness.  I found chanterelles on sale and used those, but you could use any mushroom.  You’re probably better off with cremini or button mushrooms.  To heighten the flavor a bit, you might consider roasting the mushrooms first, or swapping the cheddar to something lighter like Doux de Montagne.

But especially great with this is the topping: a crumble of french bread, parsley, parmesan and chopped portobello “bacon.”  Which isn’t real bacon, obviously, and for meat-eaters, it won’t be the same.  It will, however, be delicious and an acceptable breakfast side for anyone, vegan or otherwise, as well as a great way to add some meaty, smoky elements into this dish while still keeping it vegetarian-friendly.  I got the idea for the portobello bacon from a friend, who introduced me to Libby Pratt’s blog.

Enjoy!

Chanterelle Mac & Cheese with Portobello “Bacon” and French Bread Topping

Ingredients

    For the mac:
  • 1 pound large shells, cooked to al dente
  • 1/2lb mushrooms of your choice, roughly chopped
  • 4 cloves garlic, minced
  • pinch of salt
  • pinch of black pepper
  • 1 tbsp olive oil
  • 1/4 cup butter plus 2 extra tbsps
  • 1/4 cup flour
  • 1/4 cup chopped parsley
  • 1 tbsp whole grain Dijon mustard
  • 4 cups milk
  • 5 cups shredded sharp cheddar
  • 1 cup grated parmesan cheese
  • For the topping
  • 1 large portobello mushroom cap, sliced and marinated in this marinade
  • 1 tbsp canola oil
  • 3-4 pieces of french bread, crumbled
  • 1 tbsp butter
  • 2 tbsp chopped parsley
  • 1/4 cup grated parmesan

Instructions

    Make the mac
  1. Preheat oven to 400F. Melt the 2 tbsps butter in a large pot w/ the olive oil. Add in the mushrooms and garlic and cook for about 5 minutes, stirring occasionally, until cooked down and soft. Add in the salt and pepper, the rest of the butter and the flour. Stir to get everything well incorporated and cook for a couple more minutes. Add in the parsley and dijon. Add in the first two cups of milk, stirring well, and then the next two, slowly. Let the milk warm up and then add in the cheeses, 1-2 cups at a time, stirring constantly to give it time to melt and smooth out.
  2. Add in the cooked pasta and then pour the entire mixture into a large oven-safe pan. Cook at 400F for 30 minutes.
  3. Make the topping
  4. Drain the portobello slices. Heat a skillet over medium high heat and add in the canola oil. Fry the portobello slices until browned and slightly crispy on the edges, 3-5 minutes per side.
  5. Remove them from the pan and drain them on paper towels. Add the tablespoon of butter to the pan and melt it. Toss in the breadcrumbs and toast them until crispy. Chop the portobello slices and add them to the pan, along with the parsley. Fold everything together.
  6. Pull the baked macaroni out of the oven and sprinkle the breadcrumb mixture over the top, and then the quarter cup of parmesan.
http://haveforkwilleat.com/2013/12/mushroom-mac-cheese-with-portobello-bacon-and-french-bread-crumbles/

Mushroom parmesan pinwheels and other ways in which mushrooms are awesome

Did you have a good Thanksgiving?  I had a good Thanksgiving.  It involved family, friends, good food, a warm house surrounded by blankets of fluffy white snow…and five or six glasses of champagne.  Cheers!

On the 3.5 hour return trip home, I alternated between listening to the History of Rome podcast Josh likes to put on for long car rides and fantasizing about all the mushroom dishes I want to make this weekend.  Specifically this first one–mushroom parmesan pinwheels: a roulade of puff pastry, goat cheese, a couple kinds of mushrooms cooked in butter with fresh herbs, and a healthy sprinkling of salty parmesan cheese.

mushroom pinwheels

homer-simpson-drooling-a

In fact, the moment we got back into town, we went to Whole Foods to pick up some chanterelle and cremini mushrooms.

This dish is a great appetizer, and that can be made ahead of time and served at room temperature.  It’s also vegetarian, easily customizable (swap out different kinds of mushrooms, herbs, cheeses, etc), easy to make and of course, delicious.

But before I get to the recipe, I want to share these fun mushroom facts.  Learning earlier this week that mushrooms can create their own breezes, I started wondering what other secret talents the little fungi possessed.  Apparently:

  • Mushrooms have no chlorophyll, so they don’t need sunlight to survive.
  • Mushrooms are one of the few natural producers of vitamin D.
  • They are found on every continent in the world and used in almost every cuisine.
  • They can be used to make natural dyes.
  • Some mushroom spores can lay dormant for decades and still grow.
  • Each mushroom contains around 16 million spores.
  • They pretty much fruit when they want to; we’re not really sure what the exact conditions need to be.

Photo Nov 29, 11 29 32 PM

Mushroom parmesan pinwheels

Ingredients

  • 1/2 lb fresh cremini mushrooms
  • 1oz dried chanterelle mushrooms
  • 4 tbsp butter
  • 1 tbsp olive oil
  • 4 cloves garlic, peeled
  • 2 tbsp chopped parsley
  • 1 tsp salt
  • 1/2 tsp pepper
  • 1/2lb fresh goat cheese
  • 1/4 cup grated parmesan
  • 1 sheet puff pastry

Instructions

  1. Unwrap the puff pastry, leave it loosely covered and let it come up to room temperature at least a half hour before starting.
  2. Dice the cremini mushrooms and garlic as finely as you can, and roughly chop the dried chanterelles as well as you can.
  3. In a medium saucepan, melt the butter and olive oil together. Add in the mushrooms, garlic and parsley and cook together on low for 12-15 minutes, stirring frequently. Stir in the salt and pepper.
  4. Let the mushroom mixture cool and then stir in the goat cheese until well-incorporated.
  5. Sprinkle the puff pastry with flour and roll it out just a bit to smooth out the creases. Spread the mushroom-cheese mixture over the puff pastry. Sprinkle half of the grated parmesan over the filling. Gently and tightly roll the puff pastry up on the long side, until you form a long roll.
  6. Carefully wrap the roll in plastic wrap and let chill in the fridge for at least 30 minutes.
  7. Preheat the oven to 375F.
  8. Remove the puff pastry roll from the fridge and, using a serrated knife, gently cut half inch rounds from the roll. Place them cut-side up on a cookie sheet that's been laid with parchment paper, and sort of squish them back into a circular shape if you need to. Sprinkle them with the rest of the parmesan cheese.
  9. Bake the rounds at 375 for about 30 minutes or until browned.
  10. Serve warm or at room temperature. Enjoy!
http://haveforkwilleat.com/2013/11/mushroom-parmesan-pinwheels-and-other-ways-in-which-mushrooms-are-awesome/

Learnist Love: All About Thanksgiving

Starting to fret about the upcoming holiday?  Don’t.  This is the internet.  Help is everywhere you look.  I’m particularly fond of all the resources curated over at Learnist.  A search for Thanksgiving brings up everything from the history of the holiday to healthy eating tips to how to keep from pulling your hair out.

Check out all the Learnist Thanksgiving resources here.

Here are a few of my personal boards for getting through Thanksgiving:

Do-It-Yourself Instant Cocoa Mix

I am about to take you on a fun-filled, wondrous adventure to a magical land called filled with flavor and delicious delights and that ever-so-sumptuous food of the gods.

That’s right, we’re going to make hot cocoa.

Photo Nov 24, 11 23 26 PM

Don’t say it.  Don’t tell me that you make hot chocolate all the time–“All you have to do is open the packet of Swiss Miss and add hot water.”  That’s not making hot cocoa.  That’s just barely making it through the day and being willing to settle for something, anything with a mere wisp of chocolate in it before you go insane and take somebody with you.

Now, while I am a fan of melting down shaved chocolate into a pool of lightly simmering, frothy milk in the celebrated winter ritual that is settling down with a piping hot cup of hot chocolate whilst mentally praising those brilliant Mayans, sometimes you don’t want to spend the time, effort or money to do that and sometimes you’re at work, mentally (or physically—although in that case, you have more serious problems than chocolate-deficiency) to a desk, or snowed in at home behind 2 feet of frozen little water pellets.  In those cases, you want–nay, you need–instant cocoa.

Photo Nov 24, 11 23 37 PM

But that doesn’t mean you should rush headlong into the arms of the Swiss Miss.  Not to impugn her honor or anything, but I hear she really gets around.  You deserve someone more special than that.  Someone unique and hand-crafted.  And I am love to play matchmaker.  Well, me and Alton Brown.

Alton Brown’s Hot Cocoa

* 2 cups powdered sugar
* 1 cup cocoa (Dutch-process preferred)
* 2 1/2 cups powdered milk
* 1 teaspoon salt
* 2 teaspoons cornstarch
* Hot water

Combine all ingredients in a mixing bowl and incorporate evenly.  Seal in an airtight container, keeps indefinitely in the pantry.

To make hot cocoa, fill half a mug with the cocoa mixture and then pour in hot water or milk.  Stir, sip, smile.

If you want to make it even more betterer (yes, that’s right, even more betterer), you can make some snickerdoodles to dip into your cocoa.

Because…Pie, Part II: Winter is Coming

It snowed last night.  I don’t know if it had even frosted yet but last night, it snowed.

It’s made my husband terribly happy.  He’s a weird, cold-loving polar bear who has somehow managed to squeeze himself into a very convincing Josh-suit.  He loves the fact that it rained and then snowed last night, even though it froze the car doors shut.

Me?  I like the snow just fine, I suppose…as long as I’m laying in my warm bed (flannel sheets for the win!).  Or snuggled on the couch with a mug of cocoa watching How I Met Your Mother or American Horror Story.  Or basically not anywhere near the outside.  If it were possible to safely and inexpensively induce hibernation in people…I would do it.  In a heartbeat.

But alas.  I live in Michigan and snow is a thing.  Winter is real.  It’s not just a Game of Thrones meme anymore.

5yz6r

My only weapon against it is flannel sheets, fuzzy socks, and an arsenal of warm, heavy comfort foods.  I have decided this is going to be the Winter of the Comfort Food, officially.  Last week was lasagna.  I’m still working on perfecting it.  Then pumpkin pie.

This week, I turned my attention to pot pie.  I love a good chicken pot pie.  It combines my top comfort food (chicken stew) with pie crust.  There is literally nothing to not like about that.  And when made in ramekins or small baking dishes, you get single-sized portions.  Easy for distributing, and repackaging, and taking for lunch the next day.


potpie-3

I spent less than half a day making these, all told.  It seems like a lot, but most of it is “put it in the oven and let it do it’s thing” time.  I roasted the chicken, made the pie crust, cooked the stew…did everything except make stock.  I used store-bought because I didn’t have any on hand, but homemade would make it even more awesome.  It was a great way to spend a cool fall day.  It’ll be a great way to pass the winter ones too.

potpie-5


potpie-6

Roasted Chicken Pot Pie

Ingredients

    For the crust
  • 1.5 cups flour
  • 1 tbsp sugar
  • 1/4 tsp salt
  • 4 tbsps cold butter, diced
  • 4 tbsp cold water
  • 2 tsps dried herbes de provence
  • For the chicken
  • 3-4 pound whole chicken, cleaned and with the organs removed
  • 1/4 cup olive oil
  • 1 tbsp dried herbes de provence
  • 1/2 tbsp sea salt
  • 1 cup frozen pearl onions
  • 3 sprigs fresh rosemary
  • 3 whole cloves of garlic
  • A little bit of chicken stock as needed for basting
  • For the filling
  • The white and dark meat from a 3-4 pound roasted chicken
  • The pearl onions roasted with the chicken
  • 1 leek, sliced and washed
  • 3 carrots, sliced into half inch rounds
  • 1 cup of frozen baby peas
  • 32oz of chicken stock
  • 1/2 cup flour
  • 1 stick of butter
  • 1 tbsp dried herbes de provence
  • 3 sprigs fresh rosemary
  • 1/2 cup of grated parmesan, divided
  • 1/4 cup of heavy cream
  • salt and pepper to taste

Instructions

    Make the pie crust
  1. Do the step either before or while the chicken is roasting. Combine the flour, sugar, salt, herbs and butter in a food processor and pulse a few times until the butter is thoroughly chopped. Slowly drizzle in the cold water while you pulse the processor until the dough forms on its own into a rough ball.
  2. Remove the dough and place it on a floured surface. Pat it into a ball shape, wrap it in plastic wrap and put it in the fridge for at least an hour.
  3. Roast the chicken
  4. Preheat the oven to 450F.
  5. Mix the olive oil, herbs and sea salt together and rub them all over the chicken, especially under the skin over the breast meat. Stuff the cavity of the chicken with the garlic and rosemary sprigs.
  6. Place the chicken in a small roasting pan with the pearl onions. Roast for approximately 1-1.5 hours (about 20 minutes per pound, or until the juices run clear), basting as needed with a little stock.
  7. Let the chicken cool before pulling the meat off.
  8. Bring the filling together
  9. In a heavy-bottomed pan, melt the stick of butter. Add in the flour and stir together, creating a roux. Cook over medium heat, stirring as needed. You want to cook the flour taste out, but not burn the roux or let it get too dark--let it go for 10 minutes or so. Add the dried herbs and rosemary to the pot, and then slowly stir in the chicken stock. Let the stock simmer for about 15 minutes.
  10. Pull the meat from the chicken, give it a rough dice with a knife, and add it to the soup, along with the leeks and carrots. Let the soup simmer down until the stock has reduced by at least a third. Add in the cream, half of the parmesan, the pearl onions and peas. Taste it and add any salt and pepper as needed.
  11. Preheat the oven to 350F.
  12. Assemble the pies
  13. Divide the stew amongst your ramekins. I used four wide, shallow ones. The amount of pies you get will vary on your ramekin size.
  14. Roll out the pie crust and, using a pizza cutter or a knife, cut out circles slightly larger in diameter than your ramekins. Carefully drape the crust over the top of the ramekins, pressing the edges over the sides, sealing in the stew.
  15. Brush the crusts with a bit of egg wash or butter, and sprinkle each one with a quarter of the leftover parmesan. Place the ramekins on a large cookie sheet, and bake them in the oven for 30-40 minutes, or until the crusts are nicely browned.
  16. Serve and enjoy. They will be hot and delicious!
http://haveforkwilleat.com/2013/11/because-pie-part-ii-winter-is-coming/

Because…Pie

I sometimes wonder who first looked at a pumpkin and thought, “let’s bake that down and pie it.”  It seems to me that the vast expanse of human culinary history really comes down to someone looking at some random item and thinking, “I should put that in a pie.”

Case in point:

One of the ways in which we traditionally separate ourselves from animals is that we are tool using species who cook our food.  No, I say.  The real separation between us and the animals is that they will look at their prey and think, “I want to eat that” whereas we look at our prey and think, “I could bake that into a pie and it would be delicious.”

pumpkinpie-1


Really, why?  Why do we fill pie shells full of ground lamb and smother it in mashed potatoes?  Why do most cultures have their own versions of hand-held goodies wrapped in pie crust so that you can eat your pie while simultaneously fighting off intruders or driving a backhoe?  Why did someone actually think to crush Cool Ranch Doritos and bake them in an onion-y filling?  Because…pie.

1269294_757896340893342_1364945213_o

Yeah, that’s pretty much all there is to it, so far as I can tell.

So to celebrate this apparently deeply ingrained appreciation for combining crust and filling, with or without another crust on top depending on said filling, I am going to share a recipe for Josh’s favorite pie: classic pumpkin.

pumpkinpie-4

pumpkinpie-3


Classic Pumpkin Pie

Ingredients

  • 1 prepared and rolled out pie crust
  • 15oz of canned pumpkin (pure pumpkin, not the pumpkin pie filling)
  • 2/3 cup granulated sugar
  • 1 tbsp pumpkin pie spice (2 parts cinnamon, 1 part ginger, 1 part nutmeg)
  • 3 eggs, slightly beaten
  • 1-2 tbsp amaretto
  • 5oz evaporated milk
  • 1/2 cup whole milk

Instructions

  1. Preheat your oven to 375F.
  2. Lay your pie crust in your pie plate so that it nestles into the sides. Trim off any excess and use it to create decorations if you like. Carefully wrap tin foil around the edges of the pie, so that they don't get too dark while it's baking.
  3. Put the pumpkin, sugar and pie spice into the bowl of a mixer and blend together. Add the eggs, amaretto, evaporated and whole milk. Blend until everything is well incorporated.
  4. Pour the batter into the pie crust. Place the pie on a cookie sheet, put it in the oven and bake it for 30 minutes.
  5. Remove the foil and continue baking the pie for another 20-30 minutes, depending on your oven. When a toothpick inserted into the pie comes out clean, pull it out of the oven and let it fully cool.
  6. Slice and eat, and store it in the fridge.

Notes

I like to use this all-butter crust recipe for my pie crusts. Not that I have anything against lard or shortening crusts, but I always have butter on hand, so it's easy for me to make.

http://haveforkwilleat.com/2013/11/because-pie/


And because they’re my favorite pies: cookie pie and cinnamon pie.  Also, for good measure, no-pie apple pie.

Homemade Hot Sauce

Relax, dear friends, and take a deep breath–maybe not too deep, you might inhale something.  But rejoice, because no, there will not be a Sriracha shortage after all.  Yay.

Now, I don’t currently make anything that rivals the marvel that is sriracha sauce, but it did get me thinking about how much I love hot sauce in general.  It’s a lot.  But the importance of a good sauce is not just the heat, it’s also about flavor.  And many hot sauces really just one or the other.

poblanohotsauce-6

Of all the things you know how to make in your home kitchen, hot sauce might not have been on the list.  It should be, though, because it’s one of the easiest things to do and then you can control both the heat and the flavor.

In my case, I like to use poblano peppers, because I love the way they taste, and serranos.  Sometimes I amp it up with habaneros or do a mix of serranos, jalapenos and other peppers.  The fun part is playing around.  Also, eating.  Definitely eating.

I’ve posted on this before, and you can find that post plus the original recipe here.

Apple cake: apple pie for minimalists

Apple CakeI don’t know if you know this about me, but I suffer from a very intense case of laziness.  It’s something I’ve struggled with for a long time.  Well, I wouldn’t say struggled, exactly.  That indicates some sort of action on my part and I’m far too lazy for that.  What’s truly amusing about the whole thing is that I really am a very productive person, all told.  Or at least, I seem to manage to be.  I have a full time job, a couple of part time gigs, a fairly active social life, clean house and lots of hobbies.  So maybe it’s less that I’m lazy and more that my time is at a premium.

Yeah, that sounds way better doesn’t it?  I should have started out with that.

Apple Cake

What was my point?  I had a point.  Oh right–so my laziness, I mean, time premium has some negative aspects to it.  The biggest one being that sometimes I want food in my mouth but I don’t want to have to make the effort to produce said food.  Oh, how I long for the halcyon future-days of the Jetsons era where I can have a robot produce food for me, put it into my mouth and help me chew.  Sure, I could crack open a box of Kraft mac or some pizza rolls–and don’t get me wrong, I will occasionally do that (anyone who tells you they never do probably has a pantry full of lies)–but generally I want real food.  Real good food.

This brings me to pie.  Pie is difficult thing.  It’s not actually that hard to make, but it takes some time.  You have to make the dough and then chill it and then there’s all that rolling and–yawn–at this point, you haven’t even put together the filling yet.  OMG.  First world kitchen problems.

Apple Cake

However, this apple cake saves the day.  All you have to do is dice some apples (with the skin on!), mix them with a super easy batter, pile them into a pan and bake.  Done.  And what you get is a delicious dessert that’s like pie, but faster and lighter.  And if you’re not a fan of pie crust, well you’re probably a vampire but you’re also going to love this dish.  And if you are a fan of pie crust, you’re still going to love this dish.  

Apple cake: apple pie for minimalists

Adapted from Strawberry Plum

Ingredients

  • 4 large or 8 small-medium honeycrisp or similar apples
  • 3/4 c. flour
  • 3/4 tsp baking powder
  • 1/8 tsp salt
  • 1 tsp cinnamon
  • 1/2 tsp grated nutmeg
  • 2 eggs
  • 3/4 cup sugar
  • 2 tbsp amaretto
  • 2 tbsp frangelico
  • 1 cup melted unsalted butter

Instructions

  1. Preheat the oven to 350F. Grease a 8 or 9 inch pie pan.
  2. Dice the apples into half inch chunks.
  3. In the bowl of your mixer, combine all the other ingredients--first the dry and then the wet. Fold in the apples.
  4. Pour the batter into the prepared pan and bake for about 1 hour (start checking it at 50 minutes, depending on your oven).
  5. Let cool, run a knife around the edge to loosen it and then slice and serve as you like.
http://haveforkwilleat.com/2013/11/apple-cake-apple-pie-for-minimalists/

Fettuccini with Roasted Red Corn

Roasted Red Corn Linguine, and Some Things I’ve Never Tried

I found red sweet corn at Whole Foods last week.  Not Indian corn.  Not the band Korn painted all up in red.  Red sweet corn.  I’d never even seen it in a store before, let alone tried it.  So I bought some, because what do you do when confronted with something new and mysterious?  You eat it.  It works for babies, it works for puppies, it can work for you, too.

redcornwoil

I’ve also never tried putting corn in pasta before.  I’ve seen it, and I’ve avoided it for a long time.  I shy against putting two carbs together in the same dish, I don’t know why.  It’s like carbs all the way down, and it makes me feel guilty.  But despite that, I decided to make linguine and add the sweet corn in to it.

It was delicious.

redcorn

Of course it was.  I wouldn’t take the time to write up a recipe that was gross or disgusting, not to mention all the photos.  What kind of bored monster do you think I am?

Anyway, other things I’ve never tried:

-Eating an entire plate of Cap’n Crunch french toast from the Bomber (it exists and it is delicious but I fear it would kill me)

-Eating green eggs with a fox.  Eating green eggs in a box.  Eating green eggs here or there, eating green eggs anywhere.

-Strawberries that taste like pineapples.

-Making tiny ice cream sandwiches out of those little cookies they give you on Delta flights.

-Rambutans.

-Making my own puff pastry because I don’t hate my free time that much.

-Chocolate covered grasshoppers.

redcornpasta-mixing

Now, I’m not saying that all of those things would be as delicious as this roasted red corn pasta…except for the french toast.  That would probably do it.  But I’m a little more inclined now to try…everything except the grasshoppers.  Maybe the grasshoppers.  Probably not the grasshoppers.

redcornpasta

Roasted Red Corn Linguine, and Other Things I’ve Never Tried

Ingredients

    For the Corn:
  • 2 ears fresh red sweet corn
  • 1/2-3/4 cup olive oil
  • 1 cup fresh basil
  • 3 whole peeled garlic cloves
  • 1/4 tsp black pepper
  • 1/2 tsp sea salt
  • For the Chicken
  • 1 pound boneless, skinless chicken breasts
  • 1/4 cup olive oil
  • 1 cup cherry tomatoes
  • 1/4 tsp black pepper
  • 1/2 tsp sea salt
  • For everything else
  • 1 pound fresh linguine noodles, cooked according to package directions
  • 1/2 cup fresh basil, chopped
  • 1 cup sliced red onion
  • 2 cups green beans, cut in half
  • 1 tbsp butter
  • pecorino romano, grated--however much you want

Instructions

  1. Preheat the oven to 400F. Line two small baking pans with tin foil.
  2. Prepare the corn: place the oil, basil, garlic, pepper and salt in a blender and puree. Brush a few tablespoons of the oil mixture all over the sweet corn. Place the corn in one of the prepared pans.
  3. Prepare the chicken: in the other tinfoiled pan, place the boneless, skinless chicken breasts and the cherry tomatoes. Drizzle the olive oil over both and sprinkle them with the salt and pepper.
  4. Place both pans in the oven and roast for 30 minutes, or until the corn is browned and soft and the chicken is cooked through. Let cool slightly. Slice the chicken into strips. Hold each corn cob up on its end and carefully cut the corn kernels off the cobs.
  5. In a large bowl, toss the cooked linguine noodles, fresh basil, red onion, green beans, butter, chicken and corn kernels with the rest of the oil/garlic/basil mixture (from step 2). Sprinkle the pasta with the grated pecorino.
  6. Enjoy!
http://haveforkwilleat.com/2013/09/roasted-red-corn-linguine-and-some-things-ive-never-tried/

Upside Down Blueberry Ginger Buttermilk Cake

Upside Down Blueberry-Ginger Buttermilk Cake

When your toast falls upside down and the delicious, melty butter side gets all icky, you feel sad.  When you flip over a USB thumb drive three times to get it into the port but fail because somehow it’s always upside down, you feel stupid.  But when someone purposely bakes a cake upside down, somehow the world seems right side up.  It’s a miracle of nature, those upside down cakes.

Upside Down Blueberry Ginger Buttermilk Cake

And while the golden standard (because it’s yellow!) will always be the classic pineapple upside down cake, peaches, apples and nectarines are also delicious.  But it’s August in Michigan (and I guess everywhere else too) so if you’re going to focus on a fruit, it had better be the noble blueberry.

Fresh Blueberries

So having a pint of blueberries left in the fridge, I figured I’d give upside down blueberry cakes a try.  It was a gamble that paid off.  A slight gamble.  Like one of the “freebies” that gets you hooked on the game, but then you have to pay next time.  I threw in some ginger because, well, I have a root of ginger and it wasn’t going to eat itself.  It’s also one of those flavors that pairs really well with lots of fruit so it seemed like a good choice.  I often just sort of go with things and see what happens.  You can’t be too conservative in the kitchen; you’ll never learn or have fun or accidentally melt a countertop (bad) or create the first chocolate chip cookie (good).


Upside Down Blueberry Ginger Buttermilk CakeI can tell you from experience, though—parmesan herb sweet marshmallows are not a bet that will pay off.  No siree.

This cake though?  Yeah you’re good.  Plus look how pretty it is!

 Upside Down Blueberry Ginger Buttermilk Cake

Upside Down Blueberry-Ginger Buttermilk Cake

Ingredients

    For the topping:
  • 1 pint of fresh blueberries
  • 1/2 stick butter
  • 1/2 cup brown sugar
  • 1 tbsp fresh grated ginger
  • pinch of nutmeg
  • For the cake:
  • 2 cups all-purpose flour, sifted
  • 1 1/4 cup sugar
  • 1 tablespoon baking powder
  • 1 teaspoon salt
  • 1/2 cup butter, softened
  • 1 cup buttermilk
  • 2 eggs, beaten
  • 1 teaspoon vanilla extract

Instructions

  1. Preheat the oven to 350F.
  2. In a mixing bowl, combine the flour, sugar, baking powder and salt. Add in the butter, milk, vanilla, eggs, ginger and cinnamon. Mix until it just comes together.
  3. Melt down half a stick of butter and half a cup of brown sugar in a small saucepan. Add in a tablespoon of fresh grated ginger and a pinch of nutmeg. Cook for a minute until the sugar is thoroughly dissolved and then pour the mixture into the bottom of a springform pan. Top with the pint of blueberries in an even layer.
  4. Pour the cake batter into the springform pan on top of the blueberries.
  5. Bake the cake in the oven for about 55-60 minutes or until a toothpick inserted comes out clean. Let cool completely.
  6. Open the springform pan and remove the sides. Carefully flip the cake over onto a plate and remove the bottom of the springform pan. If any berries came undone, just fudge them back into place a bit. Ta da!
http://haveforkwilleat.com/2013/08/upside-down-blueberry-ginger-buttermilk-cake/


Olive Oil Poached Tomato Sauce

Olive Oil Poached Tomato Sauce and Zucchini Pizza

I spent two days this weekend digging and playing around in a bed of chocolate.  Chocolate mulch, actually.  I was gardening.  It still smelled delightful.  It somewhat mitigated the hot, hard work of digging and planting.  Of course, afterwards, my sore muscles really wanted a nice hot bath.  So much so that as I was making dinner, I was a little jealous of the tomatoes in this sauce.

Olive Oil Poached Tomato Sauce

I mean, look at those little red balls of tastiness bobbing in a warm, simmering olive oil bath.  That’s the life right there, surrounded by fragrant, relaxing herbs.  Isn’t that just the life?

So this sauce is delicious and it only takes 20 minutes to pull together.  It could work on pasta, pizza, poured over grilled meats and veggies or just dip your bread in it.

I used it to make zucchini pizza.  Take a few zucchini, cut them in half lengthwise and scoop out some of the flesh.  Then pile on some toppings–I do cheese, a couple layers of pepperoni, the sauce and more cheese.  Then put them on a cookie sheet and bake them for 350F for 30 minutes.  Voilà.  Crust-free, zucchini pizza with delicious homemade sauce.

Zucchini Pizza

Olive Oil Poached Tomato Sauce and Zucchini Pizza

Yield: About 2 cups

Ingredients

  • 2 pints cherry tomatoes
  • 2 cloves garlic
  • 1 cup fresh basil leaves
  • 1/2 cup fresh parsley
  • 1/4 cup fresh thyme sprigs
  • 1/2 cup fresh oregano sprigs
  • 1/4 tsp pepper
  • 1/2 tsp sea salt
  • 1 tsp brown sugar
  • 3/4 tsp red pepper flake
  • 1/2 cup olive oil

Instructions

  1. Put everything into a saucepan. Bring the olive oil to a simmer and let it cook at that level for 20 minutes.
  2. Pour the mixture into a blender, pulling out any herb stems. For a chunky sauce, pulse a few times until the large pieces are broken up. For a smoother sauce, puree completely.
  3. Pour over...anything.
http://haveforkwilleat.com/2013/08/olive-oil-poached-tomato-sauce-and-zucchini-pizza/

Basil Ravioli with Green Pea Sauce and Ham

Simple Basil Wonton Ravioli

Got to visit Boston for the first time this past week.  I was there for a conference and didn’t get to see a lot of the city, but I did walk a fair bit around the Back Bay area where the conference was.  It was beautiful and I can’t wait to go back.  I also got to have my first modernist, molecular gastronoy-esque meal at L’Espalier.  The dinner was incredible–you can check out my pics here.  And it was definitely an experience.

However, after a whole week of eating out, I was really ready to come home and cook something.  I also wanted something really simple.  It’s just me this weekend–Josh is in Vegas for his own conference (I know, right?)–so I figured I’d make myself something low-key.

Basil Ravioli with Green Pea Sauce and Ham

Normally, making ravioli is a little bit of a production, but for general ease, I like to use wonton wrappers.  They don’t produce exactly the same texture, but they’re good and fun nonetheless–plus, one less series of steps to take.  Here, I just wanted to showcase the basil fresh out of my garden with a little bit of creamy cheese and some olive oil.  I also wanted to use up the rest of the frozen peas sitting in my freezer, so I made another batch of delicious green pea-mint sauce.  That plus some diced, crispy ham made for a light, lovely repast.

basil ravioli

Simple Basil Wonton Ravioli Non-Recipe

Yield: 6 ravioli

Serving Size: 1

Ingredients

  • 6 wonton raviolis
  • 6 teaspoons mascarpone cheese
  • 6 small basil leaves
  • salt & pepper
  • grated parmesan cheese for sprinkling
  • 2 tbsp olive oil in a small bowl
  • 2 tbsp water in small bowl
  • 2 oz ham, chopped
  • 1 tbsp canola oil
  • 1 tbsp butter

Instructions

  1. Prepare a pot of gently simmering water.
  2. Lay out a wonton wrapper. Brush it with some of the olive oil. Place about a teaspoon of mascarpone cheese in the center and top it with a small basil leaf. Sprinkle on a little bit of salt and pepper and grated parmesan.
  3. Dip your brush into the water and brush around the edges of the wrapper. Then fold the bottom corner up to the opposite corner, creating a triangle, carefully smoothing the edges of the wrapper together into a tight seal.
  4. Repeat for each additional wonton wrapper.
  5. Gently lower the ravioli into the pot of simmering (not boiling!) water and cook for about 2-3 minutes. Remove and let dry on a paper towel.
  6. Heat up the canola oil and butter in a medium-sized frying pan. Add in the diced ham and fry until crispy, then add in the ravioli and (gently again) fry until crisp and browned on each side.
  7. Serve the ham and wonton ravioli with a healthy drizzle of green pea-mint sauce, or even just a bit of olive oil or browned butter.
http://haveforkwilleat.com/2013/08/simple-basil-wonton-ravioli/

Chicken with Mint Sauce and Rosemary Potatoes

Green Pea Mint Sauce for Two

We have a new fence!  It’s very exciting.  It looks beautiful and it’s intact.  It’s also four feet tall at the shortest level, so Maggie (our Mastiff) has to stand up on her hind legs in order to peer over it, which she can’t do for very long.  She ends up looking like a prairie dog, searching the horizon for predators, before popping her head back into the confines of the yard.  It’s hilarious.

it also has nothing to do with green pea mint sauce.  Well, at best, they are only tangentially related.  But this sauce is as delicious and easy as Maggie is hilarious.  It’s a particularly great recipe if you’re just cooking for yourself or for  the two of you.  It’s quick, has few ingredients and requires little effort, but it can jazz up some leftover chicken breasts or a rotisserie bird with a great, fresh burst of flavor.

Chicken with Mint-Pea Sauce

It was actually my dinner tonight, along with a side of rosemary potatoes (see below) and this week’s Champagne Wednesday watermelon cocktail.  And it was delicious.  Cooking for one often ends up being quick and simple but that doesn’t mean you can’t treat yo’self.  And sure, the heavy cream in this recipe might negate some of the healthier aspects of the peas but the verdent green color will at least make you feel really good :).

Rosemary Potatoes


Green Pea Mint Sauce

Yield: 2 servings

Ingredients

  • 1 tablespoon olive oil
  • 1 cup frozen peas
  • 3-4 fresh mint leaves
  • 1/4 cup heavy cream
  • 1 oz herbed goat cheese
  • salt and pepper to taste

Instructions

  1. Heat a small saucepan on the stove over medium heat. Add the butter and the peas and cook, stirring occasionally, until the peas are thawed and heated through.
  2. Add half the peas to the blender, along with the mint and and heavy cream. Purée until smooth. If you need a slightly thinner consistency, add some chicken or veggie stock, one teaspoon at a time until the desired results are achieved.
  3. Add the pea puree back into the sauce pan, along with the herbed goat cheese. Cook until the goat cheese has melted into the peas, stirring occasionally.
  4. Taste and add salt and pepper as needed. Serve over...well, anything, but I found grilled chicken to be particularly good.
http://haveforkwilleat.com/2013/07/green-pea-mint-sauce/

Here’s  a “no recipe” recipe for rosemary potatoes: quarter some new potatoes.  Put them in a saucepan and cover them with at least a spare inch of water.  Boil until fork-tender.  Drain the water and add in a tablespoon of butter and a teaspoon of olive oil, as well as some chopped rosemary and a sprinkling of sea salt and cracked pepper.  Cook over medium high heat until browned and crispy, stirring occasionally.


ChefSteps_-_Learn_how_to_be_a_better_cook.-3

Learn the Science of Cooking: ChefSteps

There are a lot of resources on the web for those of us who want to learn more about cooking without ponying up the time, cash and commitment it would take to go through a culinary program.  Maybe you just want to learn a couple of dishes, maybe you want to learn a particular skill, or maybe you’re really interested in the science behind how cooking processes work.  For those of you interested in the latter two, you might want to check out this site: ChefSteps.

ChefSteps is a FREE(!) site out of Pike Place Market in Seattle that has courses and mini-tutorials on why things work and how things work, as well as how to do something and some basic recipes.  You can get instruction on certain aspects of molecular gastronomy like how to centrifuge strawberry juice or the science of spherification.  It’s may not be something you’ll want to do as a beginner, but it’s definitely great knowledge to have stored away, and you can learn a lot of fun, advanced things to do in the kitchen.  I have no connection to this site at all, but I’ve been trying it out and it’s pretty fun.

Particularly awesome:

- They have a course on the Science of Poutine.  Seriously.
– They have text and image tutorials showing you how to do each step of a process.
– You can filter videos by recipe, technique or science, as well as beginner, intermediate or advanced.

Again, I wouldn’t really consider these “beginner courses.”  If you have never so much as boiled water, you might want to start with learning basic processes, patterns and ingredients for cooking, but once you’ve gotten all that down and you want a real challenge, this is an awesome resource.  Also free!

Check Out ChefsSteps