Monthly Archives: August 2013

Plum Cocktail

This Week’s Cocktail: Plum Delicious

I know who did it.  I know who did it.  It was Professor Plum, with the dagger, in the kitchen.

Right?

Fresh PlumsI always did love Clue.  Also, cheesy food puns (ha! “cheesy!”).  And this cocktail gave opportunities for both of those.  Also, for a delicious libation using some of summer’s most beautiful fruits.  I’ll let you decide which plums you want to use—red, black, yellow, whatever.  Combine them here with sugar, limes, gin and we’re going to replace the sparkling water in this recipe with your favorite sparkling wine.

Now, the original recipe from the amazing Miss Martha herself makes 10 drinks.  Now, maybe you’re having a lot of company.  That’s great.  But if it’s just you, 10 servings might be a tad overdoing it.  So feel free to cut it down a bit.  Essentially, you’re going to use the sugar plus 1.5 cups of water to make a simple syrup, adding in the plums near the end for flavor.  You can stick with that part.  Then just follow step 2 in the instructions for each individual cocktail you want to make.

Update: I have to say, I actually really enjoyed this cocktail.  It was very sweet, so if sweet’s not your thing, you may want to skip it.  But it was delicious and lovely to look at in the giant round globe glasses I used.  Also…super boozy!

Enjoy!

Martha’s Plum Cocktail Recipe

 Plum Cocktail

Upside Down Blueberry Ginger Buttermilk Cake

Upside Down Blueberry-Ginger Buttermilk Cake

When your toast falls upside down and the delicious, melty butter side gets all icky, you feel sad.  When you flip over a USB thumb drive three times to get it into the port but fail because somehow it’s always upside down, you feel stupid.  But when someone purposely bakes a cake upside down, somehow the world seems right side up.  It’s a miracle of nature, those upside down cakes.

Upside Down Blueberry Ginger Buttermilk Cake

And while the golden standard (because it’s yellow!) will always be the classic pineapple upside down cake, peaches, apples and nectarines are also delicious.  But it’s August in Michigan (and I guess everywhere else too) so if you’re going to focus on a fruit, it had better be the noble blueberry.

Fresh Blueberries

So having a pint of blueberries left in the fridge, I figured I’d give upside down blueberry cakes a try.  It was a gamble that paid off.  A slight gamble.  Like one of the “freebies” that gets you hooked on the game, but then you have to pay next time.  I threw in some ginger because, well, I have a root of ginger and it wasn’t going to eat itself.  It’s also one of those flavors that pairs really well with lots of fruit so it seemed like a good choice.  I often just sort of go with things and see what happens.  You can’t be too conservative in the kitchen; you’ll never learn or have fun or accidentally melt a countertop (bad) or create the first chocolate chip cookie (good).


Upside Down Blueberry Ginger Buttermilk CakeI can tell you from experience, though—parmesan herb sweet marshmallows are not a bet that will pay off.  No siree.

This cake though?  Yeah you’re good.  Plus look how pretty it is!

 Upside Down Blueberry Ginger Buttermilk Cake

Upside Down Blueberry-Ginger Buttermilk Cake

Ingredients

    For the topping:
  • 1 pint of fresh blueberries
  • 1/2 stick butter
  • 1/2 cup brown sugar
  • 1 tbsp fresh grated ginger
  • pinch of nutmeg
  • For the cake:
  • 2 cups all-purpose flour, sifted
  • 1 1/4 cup sugar
  • 1 tablespoon baking powder
  • 1 teaspoon salt
  • 1/2 cup butter, softened
  • 1 cup buttermilk
  • 2 eggs, beaten
  • 1 teaspoon vanilla extract

Instructions

  1. Preheat the oven to 350F.
  2. In a mixing bowl, combine the flour, sugar, baking powder and salt. Add in the butter, milk, vanilla, eggs, ginger and cinnamon. Mix until it just comes together.
  3. Melt down half a stick of butter and half a cup of brown sugar in a small saucepan. Add in a tablespoon of fresh grated ginger and a pinch of nutmeg. Cook for a minute until the sugar is thoroughly dissolved and then pour the mixture into the bottom of a springform pan. Top with the pint of blueberries in an even layer.
  4. Pour the cake batter into the springform pan on top of the blueberries.
  5. Bake the cake in the oven for about 55-60 minutes or until a toothpick inserted comes out clean. Let cool completely.
  6. Open the springform pan and remove the sides. Carefully flip the cake over onto a plate and remove the bottom of the springform pan. If any berries came undone, just fudge them back into place a bit. Ta da!
http://haveforkwilleat.com/2013/08/upside-down-blueberry-ginger-buttermilk-cake/


Cornbread_in_cast_iron_pan

Marc’s Corner: Cooking with Cast Iron

I noticed that cast iron cookware seem to be making a bit of a comeback lately. And that is not a bad thing at all. My salute to the Food Network and a plethora of cooking shows out there for re-popularising cookware that has been with us for hundreds of years.

I am going to spare everyone an otherwise boring lesson on the history of cast iron cookware and get right down to the crux of it in this short article. You can find plenty of historical references on the interwebs. Continue reading

Feel Like Holiday Cocktail

Feel Like Holiday

Summer is almost over.  Seriously.  August is half gone.  School starts in two weeks.  Labor Day is right around the corner.  It’s madness, I tell you!  I haven’t been to a single beach, taken a single trip for fun, or wasted $500,000 on movie tickets on terrible action films…yet.  This is a dark time, indeed.

So in honor of the last days of my favorite season, and the fact that I totally could use a vacay, this week’s Champagne Wednesday cocktail will be the Feel Like Holiday.

Does it bug anyone else that the name isn’t grammatically correct?  Cause it bugs me.  But it does sound delicious.

Feel Like Holiday Cocktail

Feel Like Holiday
from DrinkMixer.com

1/3oz  vodka
1/3 oz grenadine syrup
3 1/3 oz Champagne

Cool the vodka and grenadine over ice.  Strain it into a champagne flut and fill with champagne.

Makes 1 cocktail.

Apps You Need: 10 of the Best iPhone Apps to Help With Recipe Substitutions

This list comes from Martina Keyhell at becomeananny.com and while I don’t post most of the solicitations that come my way, I did think this list had some merit…and I know recipe substitutions are necessary things to have on hand!  I have often either run out of an ingredient, or didn’t want to use it because of allergies or just general dislike.  Knowing what you can substitute and when can really come in handy, especially for those of you with food allergies or cooking for someone who has allergies.

Check out the full list of recipe substitution apps here.

Improve Your Fitness with Activity Trackers

In my last post  I introduced the iHealth activity tracker. I gave my review of how usable, convenient and useful it was for me. This month I’m going to focus on how specifically it can help you be more active and help you start to build some habits around fitness.

During my testing of the device, I found a few of it’s abilities quite useful for helping to improve your activity level. The three key features I like are 1) setting goals 2) idle alarms and 3) partner integrations. Let me break them down:

1) Setting Goals

Within the iPhone app you are able to set your daily step goals. By default, this setting is set to 10,000 steps per day. This is an average number for an average person, however, this doesn’t mean it’s the right goal for you. This is an important piece! Most people take less than 5000 steps per day so to jump right to double that might not be ideal.

To best set your own personal goal, I suggest tracking your activity for a few days. Calculate your average daily steps and then add 500-1000 as your first goal. Once you can reach that goal consistently, you can increase it by another 500-1000 steps per day. The fun part is in the daily view. In the tracker, it shows your daily progress with a cute little frog on a podium. As you progress through the day you go from the ground, to 3rd, 2nd and finally 1st place!

Activity Tracker

2) Idle Alarms

This feature surprised me when I first set it up, literally! The idle alarm is a special alarm that goes off any time you are idle for the given amount of time. So, if you’ve been sitting at your desk for hours, the alarm will go off and tell you to get up and be active. You can set it for hours or even minutes. I played with it at 30 minutes for a while to remind me to at least stand up and stretch my body a bit a couple of times per hour. You’ll be surprised with how quickly 30 minutes of sitting can go by!

3) Partner Integrations

Through your iHealth web account, you can link your account to other services. The one I love most is of course Evernote, however, you can also link to your RunKeeper account or your MyFitnessPal account. By linking your device to these services, iHealth will automatically sync your data to those accounts. This is great for activity and calorie monitoring on those platforms. This integration allows you to keep
a bigger picture eye on things and easily keep all your data linked in one place.

Activity Tracker

I’d love to hear about your success. Has using an activity tracker helped you increase your activity and fitness?

Stainless_Steel

Marc’s Corner: More About Stainless Steel Cookware

I was having coffee with a buddy of mine some time back and we were talking about cookware. He popped a very interesting question to me. What the hell is this business with the 18/10 or 18/8 grade stainless steel that you see on some pots and pans?

It dawned on me that a lot of people who are not in the business of cooking may not know this as well. So here’s my take on this and hopefully it will shed some light on the subject and hopefully make some of you out there walk into your kitchen after reading this to take a closer look at your stainless steel pots and pans if you own them. Continue reading

Olive Oil Poached Tomato Sauce

Olive Oil Poached Tomato Sauce and Zucchini Pizza

I spent two days this weekend digging and playing around in a bed of chocolate.  Chocolate mulch, actually.  I was gardening.  It still smelled delightful.  It somewhat mitigated the hot, hard work of digging and planting.  Of course, afterwards, my sore muscles really wanted a nice hot bath.  So much so that as I was making dinner, I was a little jealous of the tomatoes in this sauce.

Olive Oil Poached Tomato Sauce

I mean, look at those little red balls of tastiness bobbing in a warm, simmering olive oil bath.  That’s the life right there, surrounded by fragrant, relaxing herbs.  Isn’t that just the life?

So this sauce is delicious and it only takes 20 minutes to pull together.  It could work on pasta, pizza, poured over grilled meats and veggies or just dip your bread in it.

I used it to make zucchini pizza.  Take a few zucchini, cut them in half lengthwise and scoop out some of the flesh.  Then pile on some toppings–I do cheese, a couple layers of pepperoni, the sauce and more cheese.  Then put them on a cookie sheet and bake them for 350F for 30 minutes.  Voilà.  Crust-free, zucchini pizza with delicious homemade sauce.

Zucchini Pizza

Olive Oil Poached Tomato Sauce and Zucchini Pizza

Yield: About 2 cups

Ingredients

  • 2 pints cherry tomatoes
  • 2 cloves garlic
  • 1 cup fresh basil leaves
  • 1/2 cup fresh parsley
  • 1/4 cup fresh thyme sprigs
  • 1/2 cup fresh oregano sprigs
  • 1/4 tsp pepper
  • 1/2 tsp sea salt
  • 1 tsp brown sugar
  • 3/4 tsp red pepper flake
  • 1/2 cup olive oil

Instructions

  1. Put everything into a saucepan. Bring the olive oil to a simmer and let it cook at that level for 20 minutes.
  2. Pour the mixture into a blender, pulling out any herb stems. For a chunky sauce, pulse a few times until the large pieces are broken up. For a smoother sauce, puree completely.
  3. Pour over...anything.
http://haveforkwilleat.com/2013/08/olive-oil-poached-tomato-sauce-and-zucchini-pizza/

Semifreddo Bellini

Semifreddo Bellini

I didn’t post a recipe for last week’s Champagne Wednesday because I was in Boston for a conference at the time.  I did get to celebrate Champagne Wednesday at L’Espalier, an awesome modernist restaurant in the Back Bay area, where we were staying.  They had a French Kiss cocktail on the menu and it just happened to be Wednesday, so I assumed it was fate.  Delicious, delicious fate.

Semifreddo Bellini

I almost decided on a green tea champagne cocktail for this week but that meant buying and preparing matcha tea in advance and…well, I got lazy.  So we’ll save that one for next week.  This week, we’re going to hold on to summer as much as we can (omg it’s August already) and celebrate with a popsicle in a glass: a semifreddo bellini.

Semifreddo means “half cold” in Italian.  It’s also the name given to a delicious, easy dessert and thanks to Martha Stewart, a sweet slushy version of the traditional bellini cocktail.  Her recipe blends frozen peaches, peach schnapps, champagne, superfine sugar and ice together, making a total of two cocktails.  Or one big cocktail if you’ve had that kind of day.  Hey, there’s no judgment here.  You do what you got to.

Semifreddo Bellini

Anyway, I can tell you the changes I’m probably going to make for this recipe myself: I think I’ll swap out the schnapps for cointreau, because I don’t have schnapps and I don’t want to buy schnapps but I do have cointreau and I think the orange-peach combination will be nice.  I’m also probably going to add in the leaves from a sprig or two of thyme, because my herbs are going insane.  Most likely I’ll muddle the time in with the sugar first before adding it all to the blender.  Hey, Champagne Wednesday is all about making a cocktail your own.  And then drinking it.  Because the best way to claim something is to eat it.

Get Martha Stewart’s Semifreddo Bellini recipe.

Semifreddo Bellini

Lauren's Semifreddo Bellini

Ingredients

  • 1 cup frozen peaches
  • 1 tablespoon fresh thyme leaves
  • 1 tablespoon sugar
  • 1 cup ice cubes
  • 1/4 cup Cointreau
  • 3/4 cup plus 2 tablespoons sparkling wine

Instructions

  1. Put the peaches, thyme, sugar, ice cubes, cointreau and the two tablespoons of sparkling wine into a blender and puree until smooth.
  2. Divide into two glasses and top each with half of the remaining champagne. Enjoy!
http://haveforkwilleat.com/2013/08/this-weeks-cocktail-semifreddo-bellini/

OLYMPUS DIGITAL CAMERA

Marc’s Corner: What You Should Know About Cutting Boards

I have been asked this question a couple of times and I thought it best to write a short one on the subject for the benefit of some of you out there who might have that thought crossed your mind.  So some people don’t give a hoot if they use a plate to slice their meat or vegetables on but as they say, right tool for the right job.

The two most common surfaces used for chopping boards are wood and plastic. Let’s explore the two and then you can decide for yourself which type suits your needs better. Continue reading

Basil Ravioli with Green Pea Sauce and Ham

Simple Basil Wonton Ravioli

Got to visit Boston for the first time this past week.  I was there for a conference and didn’t get to see a lot of the city, but I did walk a fair bit around the Back Bay area where the conference was.  It was beautiful and I can’t wait to go back.  I also got to have my first modernist, molecular gastronoy-esque meal at L’Espalier.  The dinner was incredible–you can check out my pics here.  And it was definitely an experience.

However, after a whole week of eating out, I was really ready to come home and cook something.  I also wanted something really simple.  It’s just me this weekend–Josh is in Vegas for his own conference (I know, right?)–so I figured I’d make myself something low-key.

Basil Ravioli with Green Pea Sauce and Ham

Normally, making ravioli is a little bit of a production, but for general ease, I like to use wonton wrappers.  They don’t produce exactly the same texture, but they’re good and fun nonetheless–plus, one less series of steps to take.  Here, I just wanted to showcase the basil fresh out of my garden with a little bit of creamy cheese and some olive oil.  I also wanted to use up the rest of the frozen peas sitting in my freezer, so I made another batch of delicious green pea-mint sauce.  That plus some diced, crispy ham made for a light, lovely repast.

basil ravioli

Simple Basil Wonton Ravioli Non-Recipe

Yield: 6 ravioli

Serving Size: 1

Ingredients

  • 6 wonton raviolis
  • 6 teaspoons mascarpone cheese
  • 6 small basil leaves
  • salt & pepper
  • grated parmesan cheese for sprinkling
  • 2 tbsp olive oil in a small bowl
  • 2 tbsp water in small bowl
  • 2 oz ham, chopped
  • 1 tbsp canola oil
  • 1 tbsp butter

Instructions

  1. Prepare a pot of gently simmering water.
  2. Lay out a wonton wrapper. Brush it with some of the olive oil. Place about a teaspoon of mascarpone cheese in the center and top it with a small basil leaf. Sprinkle on a little bit of salt and pepper and grated parmesan.
  3. Dip your brush into the water and brush around the edges of the wrapper. Then fold the bottom corner up to the opposite corner, creating a triangle, carefully smoothing the edges of the wrapper together into a tight seal.
  4. Repeat for each additional wonton wrapper.
  5. Gently lower the ravioli into the pot of simmering (not boiling!) water and cook for about 2-3 minutes. Remove and let dry on a paper towel.
  6. Heat up the canola oil and butter in a medium-sized frying pan. Add in the diced ham and fry until crispy, then add in the ravioli and (gently again) fry until crisp and browned on each side.
  7. Serve the ham and wonton ravioli with a healthy drizzle of green pea-mint sauce, or even just a bit of olive oil or browned butter.
http://haveforkwilleat.com/2013/08/simple-basil-wonton-ravioli/

iHealth Activity Tracker

The iHealth Activity Tracker – My Review

Over the past month or so, I’ve been testing out an Activity Tracking from iHealth.

iHealth Activity Tracker

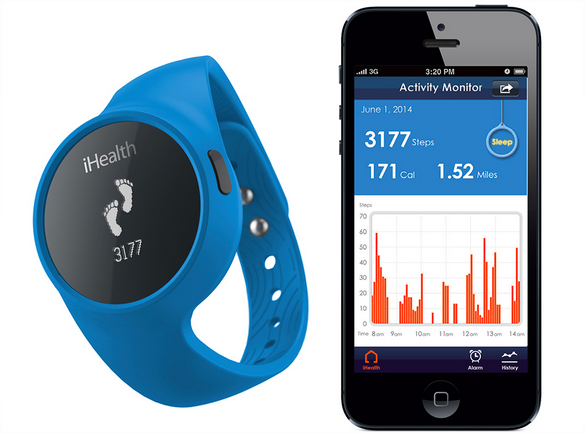
Activity trackers are small devices that we wear on our body to track our activity throughout our day. Usually these devices track data like steps taken, distance travelled, and calories burned. iHealth’s tracker also has the ability to track your sleep quality at night, set daily goals and even notify you when you are being inactive.

The goal is to gather data that builds a picture of your daily activity. This is actually a very popular thing and there’s even a movement titled Quantified Self where people are looking to gain self knowledge through self tracking.

Anyway, back to the iHealth activity tracker.

I’ve been testing it out personally so I can see how well it would work with my clients. I wanted to see 1) how easy it was to use, 2) how convenient it was to wear and 3) whether or not I found the data useful. Here are my findings.

1) How easy is it to use? 

Use of the device was actually very simple for me. It only has one button, so it can’t get much easier than this. Pressing the button cycles through the different measurements of steps, distance, calories and a fun little graphic that shows you how close you are to your daily goal by a 1st, 2nd and 3rd place podium.

The other use of the device is through bluetooth connection to your iPhone. For me, this process went exactly as outlined in their manual. However, for Kelly (who was also testing a device) she had much more difficulty. We were actually un-able to connect the device to her phone and had to set it up with her iPad. (I played with it for an hour and couldn’t figure it out. We did not contact customer support)

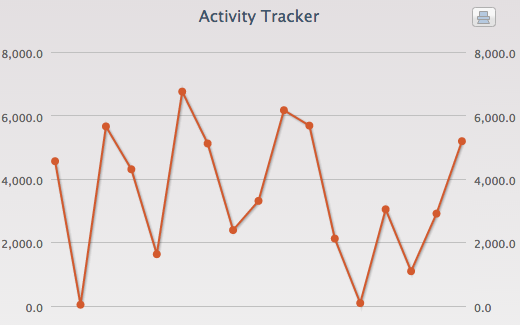
Once connected to my phone, it was very simple. In the iHealth App, all I had to do was click on the Activity section and it would connect to the device and sync. All the data was there in a nice pretty graph that was easy to read.

2) How convenient is it to wear?

The iHealth tracker comes with both a wrist strap and a waist clip. I found I was wearing the wrist strap more often because I like to wear a watch. However, it’s not really a replacement for my watch, so often it appeared like I was wearing two watches.

It’s great to have the wrist and waist options, but this created a small problem. The waist clip is better during the day when tracking steps, but the wrist strap is better at night when tracking sleep. The problem comes in when switching between the two. I’m not sure if it was just me and my large fingers, but I found it challenging to switch the device around, especially when taking it out of the waist clip.

3) Was the data useful?

I wore the activity tracker for a couple of weeks and got a lot of data. Data about my steps in a day, data about my sleep at night, and even data about how often I’d forget to wear it. The data was interesting and even a little surprising at times. I realized that some days I didn’t walk nearly as much as I thought.

I found that the data got less exciting over time. I started to see my averages, I started to see the trends, and day after day, week after week, it didn’t tell me much that was new. So, I was less motivated to keep wearing it once I knew my trends. However, I think my opinion is very skewed in this aspect.

I believe these trackers are best for someone who isn’t very active. Because I am very active, this data wasn’t really new information for me. I already exercise regularly and get frequent activity. The activity tracker seemed to show me what I already knew, and to have a few days of lower activity isn’t a concern for me.

However, if you’re someone who isn’t very active and spends a lot of time at the desk, this little device can be an amazing tool. There are a few key features that can really help you focus on being more active, and help you start to build some habits around fitness.

Stay tuned for my future post about what these key features are and how you can use them to start increasing your activity level!

Have you used an activity tracker before? What was your experience using it?
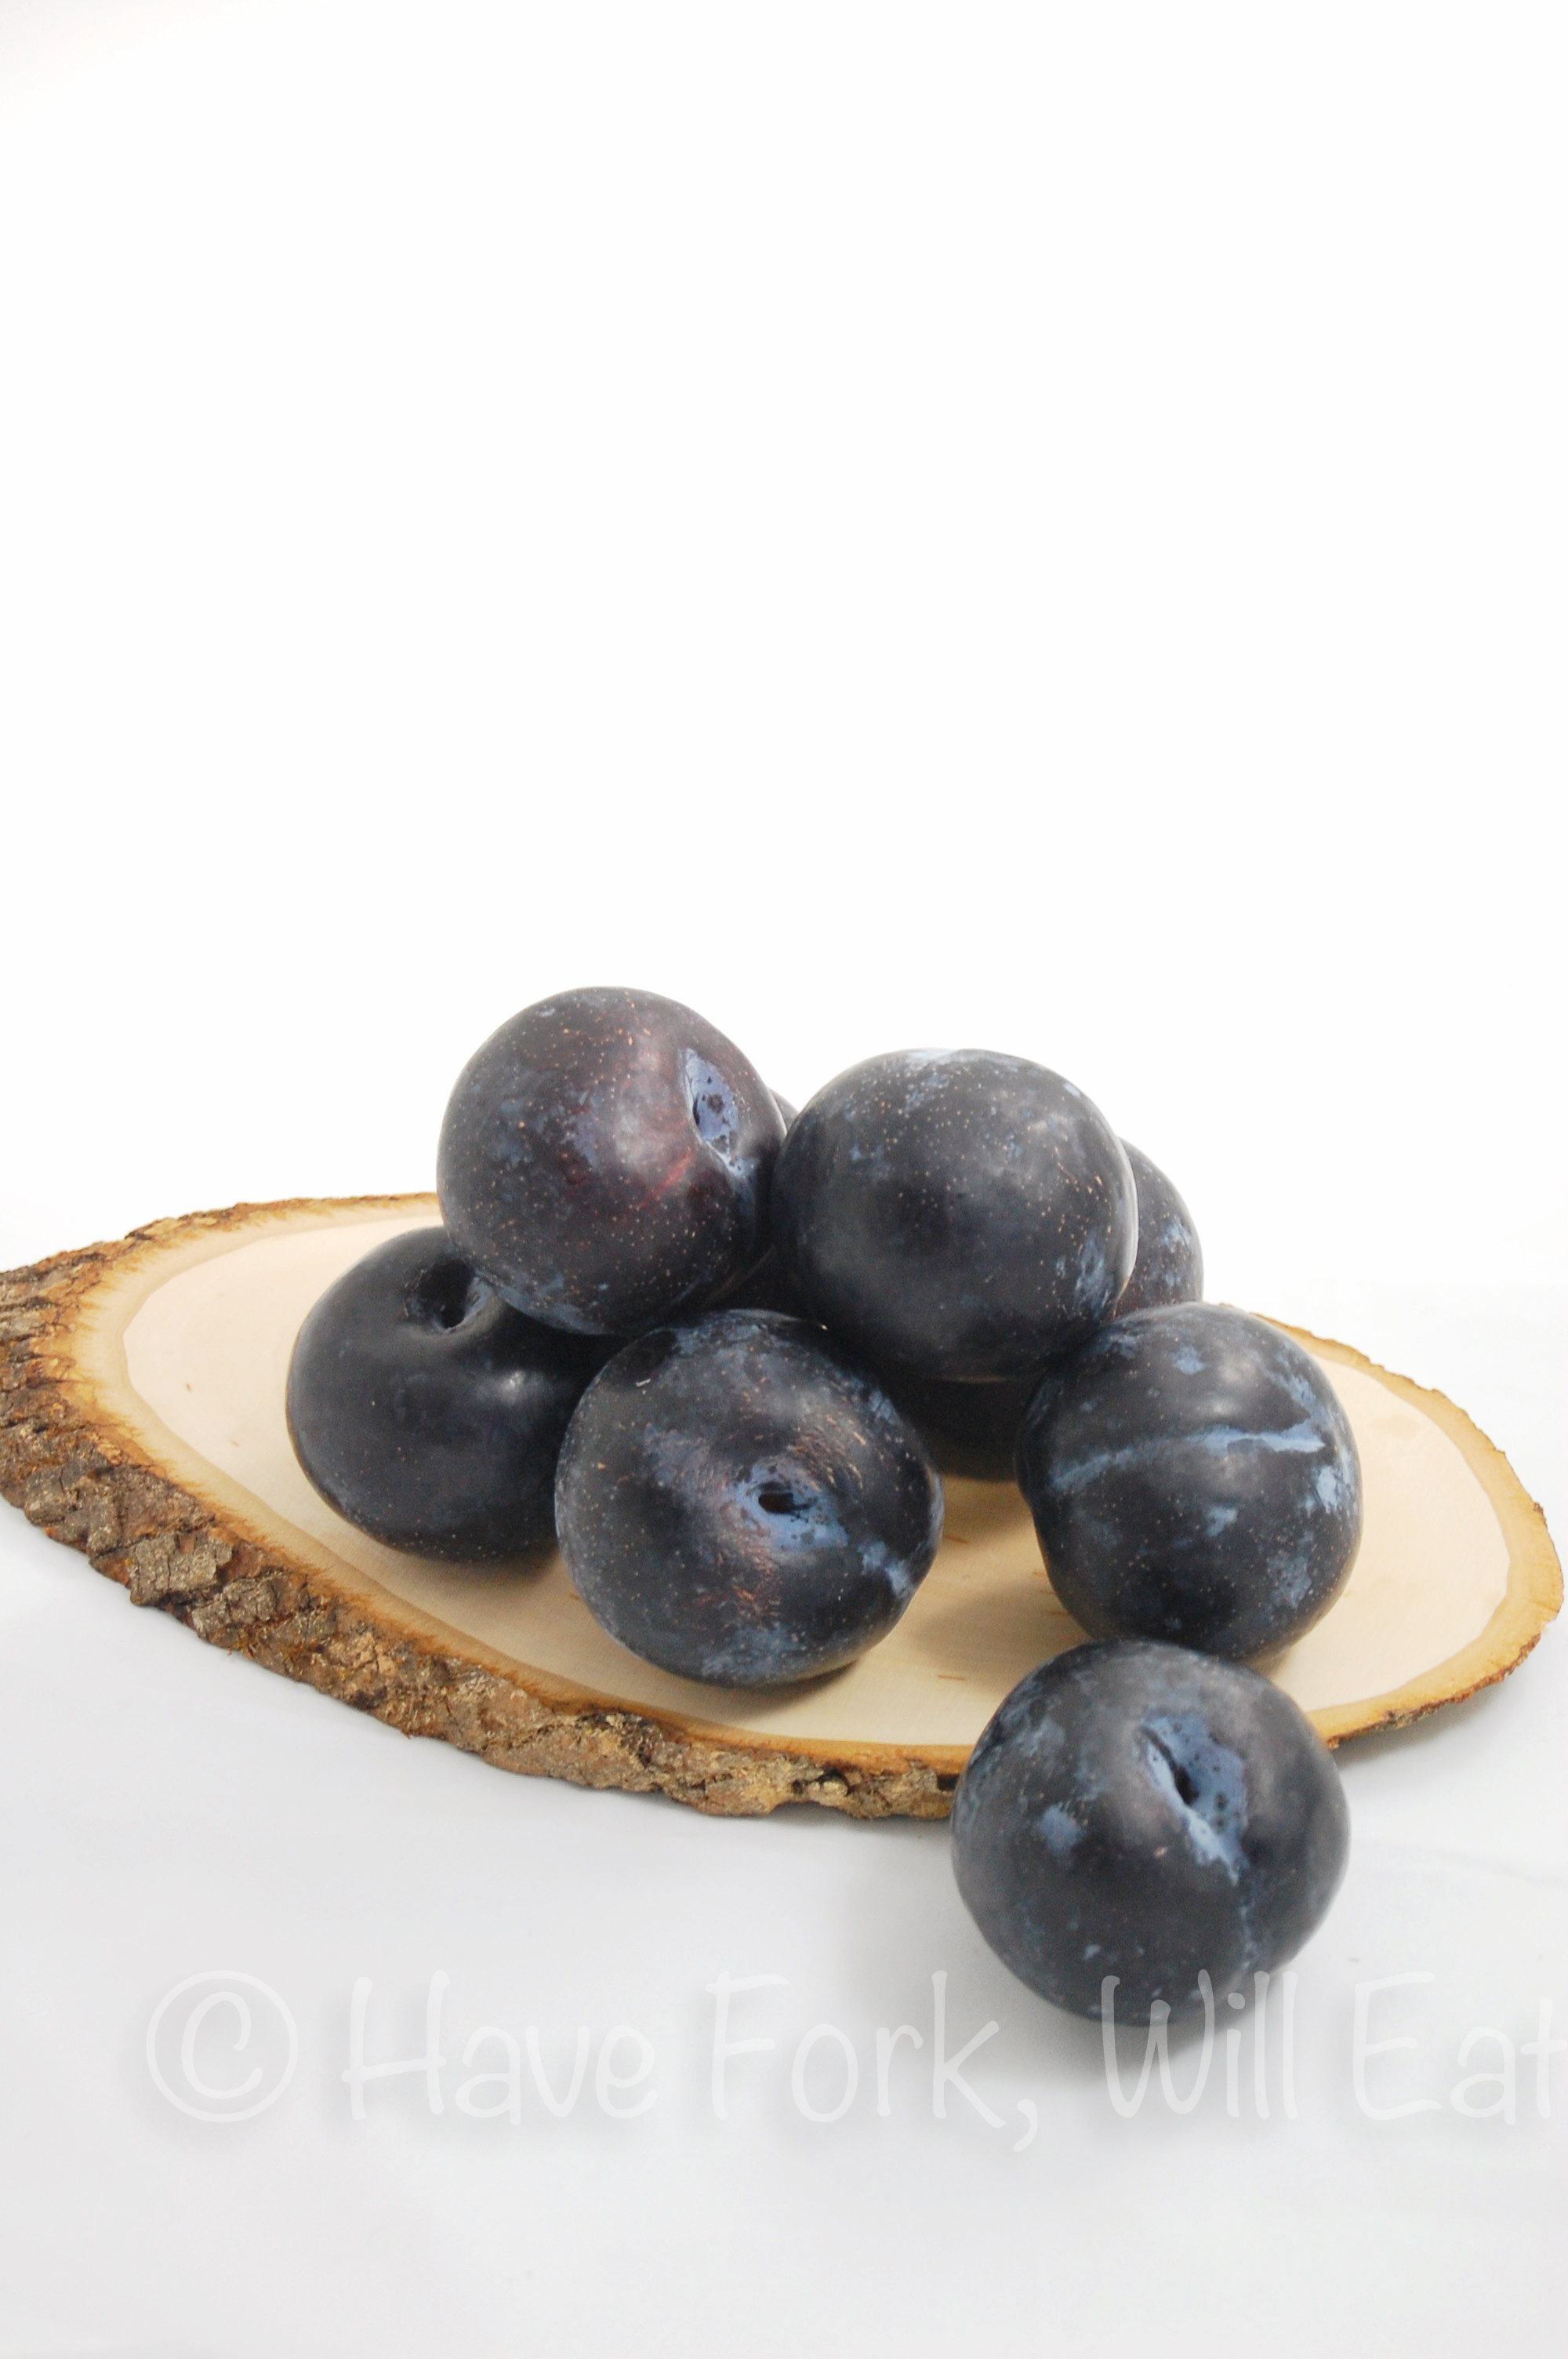